UDN
Search public documentation:
MasteringUnrealScriptDelegates
日本語訳
中国翻译
한국어
Interested in the Unreal Engine?
Visit the Unreal Technology site.
Looking for jobs and company info?
Check out the Epic games site.
Questions about support via UDN?
Contact the UDN Staff
中国翻译
한국어
Interested in the Unreal Engine?
Visit the Unreal Technology site.
Looking for jobs and company info?
Check out the Epic games site.
Questions about support via UDN?
Contact the UDN Staff
- CHAPTER 12 - DELEGATES
- 12.1 - OVERVIEW
- 12.2 - DECLARING A DELEGATE
- 12.3 - DELEGATES AS VARIABLES
- 12.4 - PASSING A DELEGATE TO A FUNCTION
- 12.5 - DELEGATES AND MEMORY
- 12.6 - UISCENE AND UIOBJECT DELEGATES
- 12.7 – OTHER DELEGATES IN UNREAL ENGINE 3 AND UNREAL TOURNAMENT 3
- AUDIOCOMPONENT
- GAMEINFO
- GAMEVIEWPORTCLIENT
- INTERACTION
- ONLINEACCOUNTINTERFACE
- ONLINECONTENTINTERFACE
- ONLINEGAMEINTERFACE
- ONLINENEWSINTERFACE
- ONLINEPLAYERINTERFACE
- ONLINEPLAYERINTERFACEEX
- ONLINESTATSINTERFACE
- ONLINESTATSREAD
- ONLINESTATSWRITE
- ONLINESYSTEMINTERFACE
- ONLINEVOICEINTERFACE
- PARTICLESYSTEMCOMPONENT
- PLAYERCONTROLLER
- UICOMBOBOX
- UICOMP_DRAWCOMPONENTS
- UIDATAPROVIDER
- UIDATASTORE
- UIDATASTORE_GAMESTATE
- UIEDITBOX
- UIEVENT
- UIOPTIONLISTBASE
- UISCREENOBJECT
- UISCROLLBAR
- UISCROLLBARMARKERBUTTON
- UITABBUTTON
- UITABCONTROL
- UITOOLTIP
- ONLINEGAMEINTERFACEIMPL
- ONLINEGAMEINTERFACEGAMESPY
- ONLINESUBSYSTEMGAMESPY
- ONLINESUBSYSTEMLIVE
- UTBOT
- UTDATASTORE_ONLINESTATS
- UTDEPLOYEDACTOR
- UTDRAWMAPPANEL
- UTEXPLOSIONLIGHT
- UTKACTOR
- UTMISSIONGRI
- UTSCOREBOARDPANEL
- UTSIMPLEIMAGELIST
- UTSIMPLELIST
- UTSKELCONTROL_CANTILEVERBEAM
- UTSKELCONTROL_TURRETCONSTRAINED
- UTSLOWVOLUME
- UTTABPAGE.UC
- UTUIFRONTEND_BINDKEYS360
- UTUIFRONTEND_BINDKEYSPC
- UTUIFRONTEND_BINDKEYSPS3
- UTUIFRONTEND_BOTSELECTION
- UTUIFRONTEND_SETTINGSPANELS
- UTUIMENULIST
- UTUIOPTIONLIST
- UTUIPANEL_MAPCYCLE
- UTUIPANEL_SINGLEMAP
- UTUIPRESSBUTTON
- UTUISCENE
- UTUISCENE_MESSAGEBOX
- UTUISCENE_SAVEPROFILE
- UTUITABPAGE_CHARACTERPART
- UTUITABPAGE_FINDQUICKMATCH
- UTUITABPAGE_GAMEMODESELECTION
- UTUITABPAGE_MAPSELECTION
- UTUITABPAGE_MUTATORS
- UTUITABPAGE_OPTIONS
- UTUITABPAGE_SERVERBROWSER
- UTUITABPAGE_SERVERFILTER
- TUTORIAL 12.1 - RANDOM EVENT MUTATOR, PART I: INTRODUCTION & INITIAL CLASS SETUP
- TUTORIAL 12.2 - RANDOM EVENT MUTATOR, PART II: TIMING LOGIC
- TUTROIAL 12.3 - RANDOM EVENT MUTATOR, PART III: USING DELEGATES
- TUTORIAL 12.4 - RANDOM EVENT MUTATOR, PART IV: GIVEBONUSARMOR()
- TUTORIAL 12.5 - RANDOM EVENT MUTATOR, PART V: GIVEREDEEMERTOALL
- TUTORIAL 12.6 - RANDOM EVENT MUTATOR, PART VI: FORCERESPAWN
- TUTORIAL 12.7 - RANDOM EVENT MUTATOR, TESTING
- TUTORIAL 12.8 - WEAPON MUTATOR, PART I: INTRODUCTION & INITAL CLASS SETUP
- TUTORIAL 12.9 - WEAPON MUTATOR, PART II: SETTING UP UTWEAP_MULTIENFORCER
- TUTORIAL 12.10 – WEAPON MUTATOR, PART III: MULTIENFORCER_BASE
- TUTORIAL 12.11 – WEAPON MUTATOR, PART IV: MULTIENFORCER_BIO
- TUTORIAL 12.12 - WEAPON MUTATOR, PART V: MULTIENFORCER_FLAK
- TUTORIAL 12.13 - WEAPON MUTATOR, PART VI: MULTIENFORCER_ROCKET
- TUTORIAL 12.14 - WEAPON MUTATOR, PART VII: MULTIENFORCER_SHOCK
- TUTORIAL 12.15 - WEAPON MUTATOR, TESTING
- TUTORIAL 12.16 - DELEGATES & KISMET, PART I: INTRODUCTION & INITIAL CLASS SETUP
- TUTORIAL 12.17 - DELEGATES & KISMET, PART II: UTEFFECTSGENERATOR
- TUTORIAL 12.18 - DELEGATES & KISMET, PART III: UTEFFECT
- TUTORIAL 12.19 - DELEGATES & KISMET, PART IV: SEQACT_SETEFFECT
- TUTORIAL 12.20 - DELEGATES & KISMET, PART V: SEQACT_USE
- TUTORIAL 12.21 - DELEGATES & KISMET, PART VI: UTEFFECT_EXPLOSION
- TUTORIAL 12.22 - DELEGATES & KISMET, PART VII: UTEFFECT_GRENADERING
- TUTORIAL 12.23 - DELEGATES & KISMET, PART VIII: UTEFFECT_GIBBAGE
- TUTORIAL 12.24 - DELEGATES & KISMET, PART IX: SETTING UP THE TEST BED
- 12.10 - SUMMARY
- SUPPLEMENTAL FILES
CHAPTER 12 - DELEGATES
Delegates are a reference to a function within an instance. Delegates are a combination of two programming concepts, functions and variables. You have seen how variables hold a value of a specific type and how it can be changed during runtime. In a way, delegates are like variables in that they hold a value and can be changed during runtime. In the case of delegates, though, that value is another function declared within a class. Delegates also behave like functions in that they can be executed. It is this combination of variables and functions that makes delegates such a powerful tool under the right circumstances.12.1 - OVERVIEW
Delegates are commonly used when the execution of code is required to be dynamic and agile during run time. Traditional methods are not agile, and are often limited. Consider:
var int GlobalVar;

function Foo(float value)
{
   GlobalVar = value;
   Bar();
}

function Bar()
{
   switch (GlobalVar)
   {
      case 0:
         DoThis();
         break;
      case 1:
         DoThat();
         break;
      default:
         DoDefault();
         break;
   }
}
This could be considered a dynamic way of changing the execution of code during runtime, however it is not an agile method of doing it. It is not agile because when more conditions are added, the effort to maintain Bar() increases. Consider:
delegate Bar();

function Foo(float value)
{
   switch (value)
   {
      case 0:
         Bar = DoThis();
         break;
      case 1:
         Bar = DoThat();
         break;
      default:
         Bar = DoDefault();
         break;
   }

   Bar();
}
This is better than before because two problems have been resolved. First the global variable is removed, as well as the need to check it when running Bar(). However, because the switch statement still exists, it will suffer the same maintenance problems as before. Instead of Bar() becoming hard to maintain, Foo() will now become hard to maintain. Consider:
delegate Bar();

function Foo(delegate<Bar> BarDelegate)
{
   Bar = BarDelegate;
   Bar();
}
This is even better than before as the switch statement has now been removed. No matter how many different conditions are added in future, Foo() or Bar() will never need maintenance.
12.2 - DECLARING A DELEGATE
Delegates are declared in the same way functions are declared, however instead of using the keyword function, delegate is used instead.delegate Foo();The class now has a delegate named Foo().
DELEGATE PARAMETERS
Delegates, like functions, are allowed to have parameters. When functions are used in conjunction with delegates, functions must also contain the same parameters as the delegate. Consider:delegate Foo(const float Bar, const float Doh); function FooBoom(const float Bar, const float Doh); function FooFail(const float Bar);Assigning FooBoom() to Foo() is valid, but assigning FooFail() to Foo() is invalid. The one exception to this rule is optional parameters. Consider:
delegate Foo(const float Bar, const float Doh, optional float Moe);

function FooBoom(const float Bar, const float Doh);
Assigning FooBoom() to Foo() is still valid, except that you could not use Moe within FooBoom(). Delegates are also allowed to have return parameters as well.
DEFAULT BEHAVIOR
Defining a body for a delegate sets the default behavior, when the delegate has not been assigned to a function. Consider:
delegate Foo()
{
   `Log(“Default behavior.”);
}

function Bar()
{
   `Log(“Non default behavior.”);
}

function Bing()
{
   Foo = Bar;
   Foo();
   Foo = none;
   Foo();
}
This would write to the script log like so,
ScriptLog: Non default behavior.
ScriptLog: Default behavior.
12.3 - DELEGATES AS VARIABLES
Delegates can be used like variables. While they cannot be used arithmetically like floats or integers, they can be assigned to and compared with. The syntax is exactly the same as assigning any other variable in Unrealscript. Consider:
delegate Foo();

function Bar();

function PostBeginPlay()
{
   Foo = Bar;
}
Sometimes it is useful to compare delegates to see what function they are currently referencing to. Consider:
delegate Foo();

function Bar();

function Rod();

function PostBeginPlay()
{
   Foo = Bar;

   if (Foo == Bar)
      `Log(“Foo is assigned to Bar()”);

   Foo = Rod;

   if (Foo != Bar)
      `Log(“Foo is not assigned to Bar()”);
}
Using comparison functions like so, may help eliminate other global variables used to track down what delegates are pointing to.
12.4 - PASSING A DELEGATE TO A FUNCTION
As delegates are like variables, we are also able to use them within function parameters. This can be useful when you want to pass delegates between functions and instances. Consider:
delegate Foo();

function Bar();

function PassDelegate()
{
   ReceiveDelegate(Bar);
}

function ReceiveDelegate(delegate<Foo> FooDelegate)
{
   Foo = FooDelegate;
}
This method of assigning delegates is important when the delegates themselves are protected or privatized from other classes. Since the delegate is private or protected, other classes would not normally have access to the delegate. Consider:
class Pizza extends Object;

private delegate Eat();

function EatMe()
{
   Eat();
}

function HowToEat(delegate<Eat> EatDelegate)
{
   Eat = EatDelegate;
}

class Mushroom extends Object;

function SpitOut()
{
   `Log(“I spit out the mushrooms, as they are disgusting.”);
}

function EatPizza(Pizza pizza)
{
   if (pizza != none)
   {
      pizza.HowToEat(SpitOut);
      pizza.EatMe();
   }
}
12.5 - DELEGATES AND MEMORY
When a delegate references a function which exists in another actor instance within the world, it is safe to destroy the actor instance. However, if a delegate references a function which exists in another object instance, the delegate must be set to none. Since Unrealscript is unable to destroy object instances on demand, all circular references must be removed. Otherwise the object instance cannot be garbage collected, and a memory leak will occur when the level changes, or when the game exits.12.6 - UISCENE AND UIOBJECT DELEGATES
UIScenes and the UIObjects used within them make use of delegates to provide easy methods of customizing the functionality of those elements. Because delegates are most commonly used in this context by modders, the delegates found within these classes are listed and explained below.UISCENE DELEGATES
- OnSceneActivated(UIScene ActivatedScene, bool bInitialActivation) - This is called when the scene becomes the active scene. ActivatedScene is the UIScene that became activated, bInitialActivation is set true if this is the first time the scene is being activated.
- OnSceneDeactivated(UIScene DeactivatedScene) - This is called when the scene becomes deactivated. DeactivatedScene is the UIScene that became deactivated.
- OnTopSceneChanged(UIScene NewTopScene) - This is called when this UIScene is used to be the top most scene, and another UIScene is going to become the top most scene. NewTopScene is the UIScene that is about to become the new top mose scene. UIScenes can be stacked on top of each other, this layering property allows you to combine different scenes together. For example a background UIScene can be made which changes rarely, and the interactive UIScene can be layered on top.
- bool ShouldModulateBackgroundAlpha(out float AlphaModulationPercent) - Provides UIScenes a way to alter the amount of transparency used when rendering the parent scene. AlphaModulationPercent is the value that will be used for modulating the alpha when rendering the scene below this one. Returns true if the alpha modulation should be applied when rendering the scene below this one.
UIOBJECT DELEGATES
- OnCreate(UIObject CreatedWidget, UIScreenObject CreatorContainer) - This is called when the UIObject is created. CreatedWidget is the UIObject that was created, UIScreenObject is the container that created the widget.
- OnValueChanged(UIObject Sender, int PlayerIndex) - This is called when the value of this UIObject has changed. This is only relevant to UIObjects that contain data values. Sender is the UIObject who invoked this delegate, PlayerIndex is the index within Engine.GamePlayers pointing to the player who triggered the event.
- bool OnRefreshSubscriberValue(UIObject Sender, int BindingIndex) - This is called when the UIObject receives a call to RefreshSubscriberValue. Sender is the UIObject that invoked this delegate, BindingIndex indicates which data store binding is being refreshed, for those UIObjects that have multiple data store bindings. It is up to the class which implements this delegate to use it. Return true if this UIObject is going to refresh its value manually.
- OnPressed(UIScreenObject EventObject, int PlayerIndex) - This is called when the UIObject is pressed. This is not implemented in all UIObject types. EventObject is the UIScreenObject that invoked this delegate, PlayerIndex is the index within Engine.GamePlayers pointing to the player who triggered the event.
- OnPressRepeat(UIScreenObject EventObject, int PlayerIndex) - This is called when the widgets has been pressed and the user is holding the button down. Not implemented by all widget types. EventObject is the UIScreenObject that invoked this delegate. PlayerIndex is the index within Engine.GamePlayers pointing to the player who triggered the event.
- OnPressRelease(UIScreenObject EventObject, int PlayerIndex) - This is called when the widget is no longer being pressed. Not implemented by all widget types. EventObject is the UIScreenObject that invoked this delegate. PlayerIndex is the index within Engine.GamePlayers pointing to the player who triggered the event.
- bool OnClicked(UIScreenObject EventObject, int PlayerIndex) - This is called when the widget is no longer being pressed. Not implemented by all widget types. This differs to OnPressRelease in that this will only be called on the UIObject that received the matching key press. OnPressRelease is called on which ever UIObject was under the cursor the key was released, which may not be the UIObject that received the key press. EventObject is the UIObject that invoked this delegate. PlayerIndex is the index within Engine.GamePlayers pointing to the player who triggered the event.
- OnDoubleClick(UIScreenObject EventObject, int PlayerIndex) - This is called when the widget has received a double-click event. Not implemented by all widget types. EventObject Is the UIScreenObject that invoked this delegate.
- bool OnQueryToolTip(UIObject Sender, out UIToolTip CustomToolTip) - This provides a way for child classes or containers to override the standard tool tip that is shown. Sender if the UIObject that will be displaying the tool tip. CustomToolTip is the tool tip that will be shown. Return true to show the tool tip, or false to prevent a tool tip from showing.
- bool OnOpenContextMenu(UIObject Sender, int PlayerIndex, out UIContextMenu CustomContextMenu) - This provides a way for script to show a custom context menu, which is a menu that pops up when the user right clicks. Sender is the UIObject that will be displaying the context menu. PlayerIndex is the index within Engine.GamePlayers pointing to the player who triggered the event. CustomContextMenu is the custom context menu that will be displayed. Return true to show the custom context menu, or return false to prevent a context menu from being displayed.
- OnCloseContextMenu(UIContextMenu ContextMenu, int PlayerIndex) - This is called when the system wants to close the currently activated context menu. ContextMenu is the context menu that will be closed. PlayerIndex is the index within Engine.GamePlayers pointing to the player who triggered the event.
- OnContextMenuItemSelected(UIContextMenu ContextMenu, int PlayerIndex, int ItemIndex) - This is called when the user selects a choice from a context menu. ContextMenu is the context menu that invoked this delegate. PlayerIndex is the index within Engine.GamePlayers pointing to the player who triggered the event. ItemIndex is the index into the context menu's MenuItems array.
- OnUIAnimEnd(UIObject AnimTarget, int AnimIndex, UIAnimationSeq AnimSeq) - This is called when ever an UI animation has finished. AnimTarget is the UIObject that invoked this delegate, AnimIndex is the animation index, UIAnimationSeq is the animation sequence.
12.7 – OTHER DELEGATES IN UNREAL ENGINE 3 AND UNREAL TOURNAMENT 3
There are important delegates within Unreal Engine 3 and Unreal Tournament 3 that are good to know, because they provide useful hooks for doing many things. This sub section will provide a list of delegates that exist in Unreal Engine 3 and Unreal Tournament 3.AUDIOCOMPONENT
- OnAudioFinished(AudioComponent AC) - This is called when the AudioComponent has finished playing back its current SoundCue, because either it has completed the playback or Stop() was called. AC references to the AudioComponent that invoked this delegate.
GAMEINFO
- bool CanUnpause() - This is useful when you need to implement a more specific condition of whether the game can be unpaused or not. By default, it is just a toggle.
GAMEVIEWPORTCLIENT
- bool HandleInputKey(int ControllerId, name Key, EInputEvent EventType, float AmountDepressed, optional bool bGamepad) - This provides child classes an opportunity to handle key input events received from the view port. It is called before the key event is passed off to the interactions array for processing. ControllerId points to the controller that triggered the event, Key is the key pressed, EventType defines what sort of event occurred, AmountDepressed is used for analog type controller and bGamepad will be True if it was from a game pad device.
- bool HandleInputAxis(int ControllerId, name Key, float Delta, float DeltaTime, bool bGamepad) - This provides child classes an opportunity to handle axis input events received from the view port. It is called before the axis event is passed off to the interactions array for processing. ControllerId points to the controller that triggered the event, Key is the key involved, Delta is the movement delta, DeltaTime is the time passed (in seconds) since the last axis was updated and bGamepad will be True if it was from a game pad device.
- bool HandleInputChar(int ControllerId, string Unicode) - This provides child classes an opportunity to handle character input events received from the viewport. It is called before the character event is passed off to the interactions array for processing. ControllerId points to the controller that triggered the event, and Unicode is the character that was typed.
INTERACTION
- bool OnReceivedNativeInputKey(int ControllerId, name Key, EInputEvent EventType, optional float AmountDepressed = 1.f, optional bool bGamepad) - Same as GameViewportClient.HandleInputKey, however it is only called when invoked natively from the GameViewportClient.
- bool OnReceivedNativeInputAxis(int ControllerId, name Key, float Delta, float DeltaTime, optional bool bGamepad) - Same as GameViewportClient.HandleInputAxis, however it is only called when invoked natively from the GameViewportClient.
- bool OnReceivedNativeInputChar(int ControllerId, string Unicode) - Same as GameViewportClient.HandleInputChar, however it is only called when invoked natively from the GameViewportClient.
- OnInitialize() - This is called from within the natively implemented Init() function, after native initialization is complete.
ONLINEACCOUNTINTERFACE
- OnCreateOnlineAccountCompleted(EOnlineAccountCreateStatus ErrorStatus) - This is called when the account creation routine has been completed. ErrorStatus will declare whether the account was created successfully or not.
ONLINECONTENTINTERFACE
- OnContentChange() - This is called when any content has changed for any of the users.
- OnReadContentComplete(bool bWasSuccessful) - This is called when the content read request has been completed. bWasSuccessful will be set true if reading was successful.
- OnQueryAvailableDownloadsComplete(bool bWasSuccessful) - This is called when the content download query has been completed. bWasSuccessful will be set true if the query was successful.
ONLINEGAMEINTERFACE
- OnCreateOnlineGameComplete(bool bWasSuccessful) - This is called when the online game creation routine has completed. bWasSuccessful will be set true if the game was created successfully.
- OnDestroyOnlineGameComplete(bool bWasSuccessful) - This is called when the online game destruction routine has completed. bWasSuccessful will be set true if the game was destroyed successfully.
- OnFindOnlineGamesComplete(bool bWasSuccessful) - This is called when the online game finding routine has completed. bWasSuccessful will be set true if the game finding routine was successful.
- OnCancelFindOnlineGamesComplete(bool bWasSuccessful) - This is called when the online game finding routine was canceled. bWasSuccessful will be set true if the game finding routine was canceled successfully.
- OnJoinOnlineGameComplete(bool bWasSuccessful) - This is called when joining an online game routine was completed. bWasSuccessful will be set true if joining the game was successful.
- OnRegisterPlayerComplete(bool bWasSuccessful) - This is called when the player registration routine was completed. bWasSuccessful will be set true if the registration was successful.
- OnUnregisterPlayerComplete(bool bWasSuccessful) - This is called when the player unregistration routine was completed. bWasSuccessful will be set true if the unregistration was successful.
- OnStartOnlineGameComplete(bool bWasSuccessful) - This is called when the game state has changed to started. bWasSuccessful will be set true if the asynchronous routine was successful.
- OnEndOnlineGameComplete(bool bWasSuccessful) - This is called when the game state has changed to ended. bWasSuccessful will be set true if the asynchronous routine was successful.
- OnArbitrationRegistrationComplete(bool bWasSuccessful) - This is called when the game has completed registration for arbitration. bWasSuccessful will be set true if the asynchronous routine was successful.
- OnGameInviteAccepted(OnlineGameSettings GameInviteSettings) - This is called when the user accepts a game invitation. This provides an opportunity for code to clean up any existing states before accepting the invite.
ONLINENEWSINTERFACE
- OnReadGameNewsCompleted(bool bWasSuccessful) - This is called when the news read routine was completed. bWasSuccessful will be set true if the routine was successful.
- OnReadContentAnnouncementsCompleted(bool bWasSuccessful) - This is called when the content announcements routine was completed. bWasSuccessful will be set true if the routine was successful.
ONLINEPLAYERINTERFACE
- OnLoginChange() - This is called when the login changes.
- OnLoginCancelled() - This is called when a login request is canceled.
- OnMutingChange() - This is called when the mute list changes.
- OnFriendsChange() - This is called when the friends list changes.
- OnLoginFailed(byte LocalUserNum, EOnlineServerConnectionStatus ErrorCode) - This is called when the login failed for any reason. LocalUserNum points to the controller id. ErrorCode represents the error that occurred.
- OnLogoutCompleted(bool bWasSuccessful) - This is called when logging out was completed. bWasSuccessful is set true if the asynchronous call completed properly.
- OnReadProfileSettingsComplete(bool bWasSuccessful) - This is called when the last read profile settings request has completed. bWasSuccessful is set true if the asynchronous call completed properly.
- OnWriteProfileSettingsComplete(bool bWasSuccessful) - This is called when the last write profile settings request has completed. bWasSuccessful is set true if the asynchronous call completed properly.
- OnReadFriendsComplete(bool bWasSuccessful) - This is called when the friends read request has completed. bWasSuccessful is set true if the read request was completed properly.
- OnKeyboardInputComplete(bool bWasSuccessful) - This is called when the keyboard input request has completed. bWasSuccessful is set true if the asynchronous call completed properly.
- OnAddFriendByNameComplete(bool bWasSuccessful) - This is called when adding a friend by name has completed. bWasSuccessful is set true if the asynchronous call completed properly.
- OnFriendInviteReceived(byte LocalUserNum, UniqueNetId RequestingPlayer, string RequestingNick, string Message) - This is called when the friend invite arrives for a local player. LocalUserNum points to the local user, RequestingPlayer is a unique identifier for the player who sent the invite to the local user, RequestingNick is the nick name of the player who sent the request, Message is an additional message.
- OnReceivedGameInvite(byte LocalUserNum, string InviterName) - This is called when the local user receives a game invite. LocalUserNum points to the local user, InviterName is the name of the person inviting.
- OnJoinFriendGameComplete(bool bWasSuccessful) - This is called when the local users finishes joining to a friend's game. bWasSuccessful is set true if the session was found and joined.
- OnFriendMessageReceived(byte LocalUserNum, UniqueNetId SendingPlayer, string SendingNick, string Message) - This is called when a friends message arrives for the local user. LocalUserNum points to the local user, RequestingPlayer is a unique identifier for the player who sent the invite to the local user, RequestingNick is the nick name of the player who sent the request, Message is an additional message.
ONLINEPLAYERINTERFACEEX
- OnDeviceSelectionComplete(bool bWasSuccessful) - This is called when the device selection request has completed. bWasSuccessful is set true if the device selection has completed successful.
- OnUnlockAchievementComplete(bool bWasSuccessful) - This is called when the achievement unlocking request has completed. bWasSuccessful is set true if the unlock achievement has completed successful.
- OnProfileDataChanged() - This is called when an external change to the player profile data has completed.
ONLINESTATSINTERFACE
- OnReadOnlineStatsComplete(bool bWasSuccessful) - This is called when reading the online stats has completed. bWasSuccessful is set true if the asynchronous call completed properly.
- OnFlushOnlineStatsComplete(bool bWasSuccessful) - This is called when flushing the online stats has completed. bWasSuccessful is set true if the asynchronous call completed properly.
- OnRegisterHostStatGuidComplete(bool bWasSuccessful) - This is called when the host stats guid registration has completed. bWasSuccessful is set true if the asynchronous call completed properly.
ONLINESTATSREAD
- OnStatsReadComplete() - This is called when reading the stats has completed.
ONLINESTATSWRITE
- OnStatsWriteComplete() - This is called when writing the stats has completed.
ONLINESYSTEMINTERFACE
- OnLinkStatusChange(bool bIsConnected) - This is called when the network link status changes. bIsConnected will be set true if a connection of some sort is found.
- OnExternalUIChange(bool bIsOpening) - This is called when the external UI display changes state. bIsOpening is set true if the UI is opening.
- OnControllerChange(int ControllerId, bool bIsConnected) - This is called when the controller connection state changes. ControllerId points to the controller whose connection state has changed, bIsConnected is set true if the controller is connected.
- OnConnectionStatusChange(EOnlineServerConnectionStatus ConnectionStatus) - This is called when the online server connection state changes. ConnectionStatus contains information about the new connection status.
- OnStorageDeviceChange() - This is called when a storage device change is detected.
ONLINEVOICEINTERFACE
- OnPlayerTalking(UniqueNetId Player) - This is called when a player is talking either locally or remotely. This will be called once for each active talker, each frame. Player points to the player who is talking.
- OnRecognitionComplete() - This is called when the speech recognition for a given player has completed. You can then call GetRecognitionResults() to get the words that were recognised.
PARTICLESYSTEMCOMPONENT
- OnSystemFinished(ParticleSystemComponent Psystem) - This is called when the particle system has finished 'playing' the particle effect. Psystem points to itself, so that if you over ride this delegate within another instance you have access to the ParticleSystemComponent which invoked the delegate.
PLAYERCONTROLLER
- bool CanUnpause() - Override this when you need different logic to determine when a player controller is able to unpause the game.
UICOMBOBOX
- UIEditBox CreateCustomComboEditbox(UIComboBox EditboxOwner) - Override this when you need different logic for creating an edit box. EditboxOwner is the UIComboBox who invoked the delegate. Returns the edit box that was created.
- UIToggleButton CreateCustomComboButton(UIComboBox ButtonOwner) - Override this when you need different logic for creating a toggle combo button. ButtonOwner is the UIComboBox who invoked the delegate. Returns the toggle button that was created.
- UIList CreateCustomComboList(UIComboBox ListOwner) - Override this when you need different logic for creating a list. ListOwner is the UIComboBox who invoked the delegate. Returns the list was created.
UICOMP_DRAWCOMPONENTS
- OnFadeComplete(UIComp_DrawComponents Sender) - This is called when the fade has been completed. Sender is the UIComp_DrawComponent who invoked the delegate.
UIDATAPROVIDER
- OnDataProviderPropertyChange(UIDataProvider SourceProvider, optional name PropTag) - This is called when a property has changed. Designed to be used between data providers and their owning data stores, as there are other call backs that you could use instead. SourceProvider is the UIDataProvider that invoked the delegate, PropTag is the name of the property that was changed.
UIDATASTORE
- OnDataStoreValueUpdated(UIDataStore SourceDataStore, bool bValuesInvalidated, name PropertyTag, UIDataProvider SourceProvider, int ArrayIndex) - This is called when the value exposed by this data store has been updated. Provides data stores a way to notify subscribers when they should refresh their values from this data store. SourceDataStore is the data store that invoked the delegate, bValuesInvalidated is true if all the data values are invalid thus requiring a full refresh, PropertyTag is the tag of the data field that was updated, SourceProvider is the data store that contains the data that was changed, ArrayIndex points to which array element was changed if the data field is a collection of data otherwise this will be INDEX_NONE (-1).
UIDATASTORE_GAMESTATE
- OnRefreshDataFieldValue() - This is called when a data field was refreshed.
UIEDITBOX
- bool OnSubmitText(UIEditBox Sender, int PlayerIndex) - This is called when the user presses enter or invokes any other action bound to UIKey_SubmitText while the edit box has focus. Sender is the edit box that invoked this delegate, the PlayerIndex is the index within Engine.GamePlayers pointing to the player who triggered the event. Return true if you wish to clear the edit box when finished.
UIEVENT
- AllowEventActivation(int ControllerIndex, UIScreenObject InEventOwner, Object InEventActivator, bool bActivateImmediately, out const array
IndicesToActivate) - UILIST
- OnSubmitSelection(UIList Sender, optional int PlayerIndex = GetBestPlayerIndex()) - This is called when the user presses enter of invokes any other action bound to UIKey_SubmitText while the list has focus. Sender is the list that invoked this delegate, the PlayerIndex is the index within Engine.GamePlayers pointing to the player who generated the event.
- OnListElementsSorted(UIList Sender) - This is called after the list's elements have been sorted. Sender is the list that invoked this delegate.
UIOPTIONLISTBASE
- UIOptionListButton CreateCustomDecrementButton(UIOptionListBase ButtonOwner) - Override this when you wish to create your own decrement button. ButtonOwner is the option list base who invoked this delegate. Returns the UIOptionListButton that you created.
- UIOptionListButton CreateCustomIncrementButton(UIOptionListBase ButtonOwner) - Override this when you wish to create your own increment button. ButtonOwner is the option list base who invoked this delegate. Returns the UIOptionListButton that you created.
UISCREENOBJECT
- NotifyActiveSkinChanged() - This is called when the active skin has changed. It will reapply this widget's style and propagate the notification to all of its children. This delegate is only called if it is actually assigned to a member function!
- bool OnRawInputKey(const out InputEventParameters EventParms) - Provides an opportunity for Unrealscript to respond to input using actual input key names. This is called when an input key event is received which this widget responds to and is in the correct state to process the event. They keys and states widgets receive input for is managed through the UI editor's key binding dialog (F8). This delegate is called before Kismet. EventParams contains information about the input event. Return true to indicate that this input key was processed and stop all further processing.
- bool OnRawInputAxis(const out InputEventParameters EventParms) - Same as OnRawInputKey.
- OnProcessInputKey(const out SubscribedInputEventParameters EventParms) - Provides an opportunity for Unrealscript to respond to input using UI input aliases. This is called when an input key event is received which this widget responds to and is in the correct state to process the event. They keys and states widgets receive input for is managed through the UI editor's key binding dialog (F8). This delegate is called after Kismet and before native code processes the input. EventParams contains information about the event. Return true to indicate that this key was processed and stop further processing.
- OnProcessInputAxis(const out SubscribedInputEventParameters EventParms) - Same as OnProcessInputKey.
- NotifyPositionChanged(UIScreenObject Sender) - This is called when the UIScreenObject has changed position. Sender is the UIScreenObject that changed its position.
- NotifyResolutionChanged(const out Vector2D OldViewportsize, const out Vector2D NewViewportSize) - This is called when the view port rendering this UIScreenObject has changed resolution. OldViewportSize is the previous resolution, where as NewViewportSize is the new resolution.
- NotifyActiveStateChanged(UIScreenObject Sender, int PlayerIndex, UIState NewlyActiveState, optional UIState PreviouslyActiveState) - This is called when the UIState of the UIScreenObject has changed, after all the activation logic has occurred. Sender is the UIScreenObject that changed states, PlayerIndex is the index within Engine.GamePlayers pointing to the player who activated this state, NewlyActiveState is the state that is now active, PreviouslyActiveState is the previous state the UIScreenObject was in.
- NotifyVisibilityChanged(UIScreenObject SourceWidget, bool bIsVisible) - This is called when the UIScreenObject has changed visibility. SourceWidget is the widget that changed visibility, bIsVisible is set true if the UIScreenObject is visible.
- OnPreRenderCallBack() - This is called before rendering.
UISCROLLBAR
- OnScrollActivity(UIScrollbar Sender, float PositionChange, optional bool bPositionMaxed = false) - This is called when any scrolling activity is detected. Sender is the UIScrollBar that sent the event, PositionChange is the number of nudge values that the scroll button changed to, bPositionMaxed is true if the marker has reached the maximum position. The return value is unused at the moment.
- OnClickedScrollZone(UIScrollbar Sender, float PositionPerc, int PlayerIndex) - This is called when the user click anywhere within the scroll zone. Sender is the UIScrollBar that sent the event, PositionPerc is a value between 0.f and 1.f representing the position of the click between the increment and decrement button. 0.f is near the decrement button, where 1.f is the increment button. PlayerIndex is the index within Engine.GamePlayers pointing to the player who triggered the event.
UISCROLLBARMARKERBUTTON
- OnButtonDragged(UIScrollbarMarkerButton Sender, int PlayerIndex) - This is called when the user presses the button and drags it with the mouse. Sender is the UIScrollbarMarkerButton that invoked the delegate, PlayerIndex is the index within Engine.GamePlayers pointing to the player who triggered the event.
UITABBUTTON
- IsActivationAllowed(UITabButton Sender, int PlayerIndex) - This provides an opportunity for other UI widgets to override activation of this button. Sender is the UITabButton being activated, PlayerIndex is the index within Engine.GamePlayers pointing to the player who triggered the event.
UITABCONTROL
- OnPageActivated(UITabControl Sender, UITabPage NewlyActivePage, int PlayerIndex) - This is called when a new page is activated. Sender is the UITabControl that invoked this delegate, NewlyActivePage is the new activated UITabPage, PlayerIndex is the index within Engine.GamePlayers pointing to the player who triggered the event.
- OnPageInserted(UITabControl Sender, UITabPage NewPage, int PlayerIndex) - This is called when a new page is inserted. Sender is the UITabControl that invoked this delegate, NewPage is the newly inserted UITabPage, PlayerIndex is the index within Engine.GamePlayers pointing to the player who triggered the event.
- OnPageRemoved(UITabControl Sender, UITabPage OldPage, int PlayerIndex) - This is called when a page has been removed. Sender is the UITabControl that invoked this delegate, OldPage is the UITabPage about to be removed, PlayerIndex is the index within Engine.GamePlayers pointing to the player who triggered the event.
UITOOLTIP
- ActivateToolTip(UIToolTip Sender) - This is called when the tool tip is about to be activated. Sender is the UIToolTip that invoked the delegate.
- DeactivateToolTip() - This is called when the tool tip is about to be deactivated.
- bool CanShowToolTip(UIToolTip Sender) - This is called when a tool tip needs to know if it can be shown or not. Provides an opportunity for other widgets to prevent a tool tip from being shown. Sender is the UIToolTip in question. Return true if you wish to display the tool tip.
ONLINEGAMEINTERFACEIMPL
- OnFindOnlineGamesComplete(bool bWasSuccessful) - Same as Engine.OnlineGameInterface.OnFindOnlineGamesComplete().
- OnCreateOnlineGameComplete(bool bWasSuccessful) - Same as Engine.OnlineGameInterface.OnCreateOnlineGameComplete().
- OnDestroyOnlineGameComplete(bool bWasSuccessful) - Same as Engine.OnlineGameInterface.OnDestroyOnlineGameComplete().
- OnCancelFindOnlineGamesComplete(bool bWasSuccessful) - Same as Engine.OnlineGameInterface.OnCancelFindOnlineGamesComplete().
- OnJoinOnlineGameComplete(bool bWasSuccessful) - Same as Engine.OnlineGameInterface.OnJoinOnlineGameComplete().
- OnRegisterPlayerComplete(bool bWasSuccessful) - Same as Engine.OnlineGameInterface.OnRegisterPlayerComplete().
- OnUnregisterPlayerComplete(bool bWasSuccessful) - Same as Engine.OnlineGameInterface.OnUnregisterPlayerComplete().
- OnStartOnlineGameComplete(bool bWasSuccessful) - Same as Engine.OnlineGameInterface.OnStartOnlineGameComplete().
- OnEndOnlineGameComplete(bool bWasSuccessful) - Same as Engine.OnlineGameInterface.OnEndOnlineGameComplete().
- OnArbitrationRegistrationComplete(bool bWasSuccessful) - Same as Engine.OnlineGameInterface.OnArbitrationRegistrationComplete().
- OnGameInviteAccepted(OnlineGameSettings GameInviteSettings) - Same as Engine.OnlineGameInterface.OnGameInviteAccepted().
ONLINEGAMEINTERFACEGAMESPY
- OnGameInviteAccepted(OnlineGameSettings GameInviteSettings) - This is the same as Engine.OnlineGameInterface.OnGameInviteAccepted().
- OnRegisterPlayerComplete(bool bWasSuccessful) - This is the same as Engine.OnlineGameInterface.OnRegisterPlayerComplete().
- OnUnregisterPlayerComplete(bool bWasSuccessful) - This is the same as Engine.OnlineGameInterface.OnUnregisterPlayerComplete().
ONLINESUBSYSTEMGAMESPY
- OnLoginChange() - This is the same as Engine.OnlinePlayerInterface.OnLoginChange().
- OnLoginCancelled() - This is the same as Engine.OnlinePlayerInterface.OnLoginCancelled().
- OnMutingChange() - This is the same as Engine.OnlinePlayerInterface.OnMutingChange().
- OnFriendsChange() - This is the same as Engine.OnlinePlayerInterface.OnFriendsChange().
- OnLoginFailed(byte LocalUserNum,EOnlineServerConnectionStatus ErrorCode) - This is the same as Engine.OnlinePlayerInterface.OnLoginFailed().
- OnLogoutCompleted(bool bWasSuccessful) - This is the same as Engine.OnlinePlayerInterface.OnLogoutCompleted().
- OnReadProfileSettingsComplete(bool bWasSuccessful) - This is the same as Engine.OnlinePlayerInterface.OnReadProfileSettingsComplete().
- OnWriteProfileSettingsComplete(bool bWasSuccessful) - This is the same as Engine.OnlinePlayerInterface.OnWriteProfileSettingsComplete().
- OnReadFriendsComplete(bool bWasSuccessful) - This is the same as Engine.OnlinePlayerInterface.OnReadFriendsComplete().
- OnPlayerTalking(UniqueNetId Player) - This is the same as Engine.OnlineVoiceInterface.OnPlayerTalking().
- OnRecognitionComplete() - This is the same as Engine.OnlineVoiceInterface.OnRecognitionComplete().
- OnReadOnlineStatsComplete(bool bWasSuccessful) - This is the same as Engine.OnlineStatsInterface.OnReadOnlineStatsComplete().
- OnFlushOnlineStatsComplete(bool bWasSuccessful) - This is the same as Engine.OnlineStatsInterface.OnFlushOnlineStatsComplete().
- OnLinkStatusChange(bool bIsConnected) - This is the same as Engine.OnlineSystemInterface.OnLinkStatusChange().
- OnExternalUIChange(bool bIsOpening - This is the same as Engine.OnlineSystemInterface.OnExternalUIChange().
- OnControllerChange(int ControllerId, bool bIsConnected) - This is the same as Engine.OnlineSystemInterface.OnControllerChange().
- OnConnectionStatusChange(EOnlineServerConnectionStatus ConnectionStatus) - This is the same as Engine.OnlineSystemInterface.OnConnectionStatusChange().
- OnStorageDeviceChange() - This is the same as Engine.OnlineSystemInterface.OnStorageDeviceChange().
- OnCreateOnlineAccountCompleted(EOnlineAccountCreateStatus ErrorStatus) - This is the same as Engine.OnlineAccountInterface.OnCreateOnlineAccountCompleted().
- OnKeyboardInputComplete(bool bWasSuccessful) - This is the same as Engine.OnlinePlayerInterface.OnKeyboardInputComplete().
- OnAddFriendByNameComplete(bool bWasSuccessful) - This is the same as Engine.OnlinePlayerInterface.OnAddFriendByNameComplete().
- OnFriendInviteReceived(byte LocalUserNum, UniqueNetId RequestingPlayer, string RequestingNick, string Message) - This is the same as Engine.OnlinePlayerInterface.OnFriendInviteReceived().
- OnReceivedGameInvite(byte LocalUserNum, string InviterName) - This is the same as Engine.OnlinePlayerInterface.OnReceivedGameInvite().
- OnJoinFriendGameComplete(bool bWasSuccessful) - This is the same as Engine.OnlinePlayerInterface.OnJoinFriendGameComplete().
- OnFriendMessageReceived(byte LocalUserNum, UniqueNetId SendingPlayer, string SendingNick, string Message) - This is the same as Engine.OnlinePlayerInterface.OnJoinFriendGameComplete().
- OnRegisterHostStatGuidComplete(bool bWasSuccessful) - This is the same as Engine.OnlineStatsInterface.OnRegisterHostStatGuidComplete().
- OnReadGameNewsCompleted(bool bWasSuccessful) - This is the same as Engine.OnlineNewsInterface.OnReadGameNewsCompleted().
- OnReadContentAnnouncementsCompleted(bool bWasSuccessful) - This is the same as Engine.OnlineNewsInterface.OnReadContentAnnouncementsCompleted().
ONLINESUBSYSTEMLIVE
- OnLoginChange() - This is the same as Engine.OnlinePlayerInterface.OnLoginChange().
- OnLoginCancelled() - This is the same as Engine.OnlinePlayerInterface.OnLoginCancelled().
- OnMutingChange() - This is the same as Engine.OnlinePlayerInterface.OnMutingChange().
- OnFriendsChange() - This is the same as Engine.OnlinePlayerInterface.OnFriendsChange().
- OnLoginFailed(byte LocalUserNum,EOnlineServerConnectionStatus ErrorCode) - This is the same as Engine.OnlinePlayerInterface.OnLoginFailed().
- OnLogoutCompleted(bool bWasSuccessful) - This is the same as Engine.OnlinePlayerInterface.OnLogoutCompleted().
- OnKeyboardInputComplete(bool bWasSuccessful) - This is the same as Engine.OnlinePlayerInterface.OnKeyboardInputComplete().
- OnLinkStatusChange(bool bIsConnected) - This is the same as Engine.OnlineSystemInterface.OnLinkStatusChange().
- OnExternalUIChange(bool bIsOpening) - This is the same as Engine.OnlineSystemInterface.OnExternalUIChange().
- OnControllerChange(int ControllerId, bool bIsConnected) - This is the same as Engine.OnlineSystemInterface.OnControllerChange().
- OnConnectionStatusChange(EOnlineServerConnectionStatus ConnectionStatus) - This is the same as Engine.OnlineSystemInterface.OnConnectionStatusChange().
- OnStorageDeviceChange() - This is the same as Engine.OnlineSystemInterface.OnStorageDeviceChange().
- OnFindOnlineGamesComplete(bool bWasSuccessful) - This is the same as Engine.OnlineGameInterface.OnFindOnlineGamesComplete().
- OnCreateOnlineGameComplete(bool bWasSuccessful) - This is the same as Engine.OnlineGameInterface.OnCreateOnlineGameComplete().
- OnDestroyOnlineGameComplete(bool bWasSuccessful) - This is the same as Engine.OnlineGameInterface.OnDestroyOnlineGameComplete().
- OnCancelFindOnlineGamesComplete(bool bWasSuccessful) - This is the same as Engine.OnlineGameInterface.OnCancelFindOnlineGamesComplete().
- OnJoinOnlineGameComplete(bool bWasSuccessful) - This is the same as Engine.OnlineGameInterface.OnJoinOnlineGameComplete().
- OnRegisterPlayerComplete(bool bWasSuccessful) - This is the same as Engine.OnlineGameInterface.OnRegisterPlayerComplete().
- OnUnregisterPlayerComplete(bool bWasSuccessful) - This is the same as Engine.OnlineGameInterface.OnUnregisterPlayerComplete().
- OnReadProfileSettingsComplete(bool bWasSuccessful) - This is the same as Engine.OnlinePlayerInterface.OnReadProfileSettingsComplete().
- OnWriteProfileSettingsComplete(bool bWasSuccessful) - This is the same as Engine.OnlinePlayerInterface.OnWriteProfileSettingsComplete().
- OnDeviceSelectionComplete(bool bWasSuccessful) - This is the same as Engine.OnlinePlayerInterfaceEx.OnDeviceSelectionComplete().
- OnUnlockAchievementComplete(bool bWasSuccessful) - This is the same as Engine.OnlinePlayerInterfaceEx.OnUnlockAchievementComplete().
- OnProfileDataChanged() - This is the same as Engine.OnlinePlayerInterfaceEx.OnProfileDataChanged().
- OnStartOnlineGameComplete(bool bWasSuccessful) - This is the same as Engine.OnlineGameInterface.OnStartOnlineGameComplete().
- OnEndOnlineGameComplete(bool bWasSuccessful) - This is the same as Engine.OnlineGameInterface.OnEndOnlineGameComplete().
- OnArbitrationRegistrationComplete(bool bWasSuccessful) - This is the same as Engine.OnlineGameInterface.OnArbitrationRegistrationComplete().
- OnReadFriendsComplete(bool bWasSuccessful) - This is the same as Engine.OnlinePlayerInterface.OnReadFriendsComplete().
- OnGameInviteAccepted(OnlineGameSettings InviteSettings) - This is the same as Engine.OnlineGameInterface.OnGameInviteAccepted().
- OnContentChange() - This is the same as Engine.OnlineContentInterface.OnContentChange().
- OnReadContentComplete(bool bWasSuccessful) - This is the same as Engine.OnlineContentInterface.OnReadContentComplete().
- OnQueryAvailableDownloadsComplete(bool bWasSuccessful) - This is the same as Engine.OnlineContentInterface.OnQueryAvailableDownloadsComplete().
- OnPlayerTalking(UniqueNetId Player) - This is the same as Engine.OnlineVoiceInterface.OnPlayerTalking().
- OnRecognitionComplete() - This is the same as Engine.OnlineVoiceInterface.OnRecognitionComplete().
- OnReadOnlineStatsComplete(bool bWasSuccessful) - This is the same as Engine.OnlineStatsInterface.OnReadOnlineStatsComplete().
- OnFlushOnlineStatsComplete(bool bWasSuccessful) - This is the same as Engine.OnlineStatsInterface.OnFlushOnlineStatsComplete().
- OnAddFriendByNameComplete(bool bWasSuccessful) - This is the same as Engine.OnlinePlayerInterface.OnAddFriendByNameComplete().
- OnFriendInviteReceived(byte LocalUserNum, UniqueNetId RequestingPlayer, string RequestingNick, string Message) - This is the same as Engine.OnlinePlayerInterface.OnFriendInviteReceived().
- OnReceivedGameInvite(byte LocalUserNum,string InviterName) - This is the same as Engine.OnlinePlayerInterface.OnReceivedGameInvite().
- OnJoinFriendGameComplete(bool bWasSuccessful) - This is the same as Engine.OnlinePlayerInterface.OnJoinFriendGameComplete().
- OnFriendMessageReceived(byte LocalUserNum, UniqueNetId SendingPlayer, string SendingNick, string Message) - This is the same as Engine.OnlinePlayerInterface.OnFriendMessageReceived().
- OnRegisterHostStatGuidComplete(bool bWasSuccessful) - This is the same as Engine.OnlineStatsInterface.OnRegisterHostStatGuidComplete().
UTBOT
- bool CustomActionFunc(UTBot B) - This is called when the bot is within the CustomAction state. B is the bot that invoked this delegate.
UTDATASTORE_ONLINESTATS
- OnStatsReadComplete(bool bWasSuccessful) - This is call when reading the stats has completed. bWasSuccessful is set true if the asynchronous call completed successfully.
UTDEPLOYEDACTOR
- OnDeployableUsedUp(actor ChildDeployable) - This is called when the deployed actor is going to be destroyed. ChildDeployable is the actor that is destroying itself.
UTDRAWMAPPANEL
- OnActorSelected(Actor Selected, UTPlayerController SelectedBy) - This is called when a node is double clicked on. Selected is the actor that was selected, SelectedBy is the UTPlayerController that did the selection.
UTEXPLOSIONLIGHT
- OnLightFinished(UTExplosionLight Light) - This is called when the light has finished and is no longer emitting light. Light is the actor that invoked this delegate.
UTKACTOR
- OnBreakApart() - This is called when the physics actor is breaking apart.
- bool OnEncroach(actor Other) - This is called when the physics actor is being encroached on. Other is the actor that this physics actor is being encroached by.
UTMISSIONGRI
- OnBinkMovieFinished() - This is called when the movie has finished playing.
UTSCOREBOARDPANEL
- OnSelectionChange(UTScoreboardPanel TargetScoreboard, UTPlayerReplicationInfo PRI) - This is called when the selection has changed. TargetScoreboard is the scoreboard that invoked this delegate, PRI is the player replication info that was selected.
UTSIMPLEIMAGELIST
- bool OnDrawItem(UTSimpleImageList SimpleList, int ItemIndex, float Xpos, out float Ypos) - This is called when the item is going be drawn. SimpleList is the list that invoked the delegate, ItemIndex is an index into the List array, Xpos is the x coordinate to draw the item, Ypos is the y coordinate to draw the item. Return false to render the item using the default method.
- OnItemChosen(UTSimpleImageList SourceList, int SelectedIndex, int PlayerIndex) - This is called when an item within the list has been chosen. SourceList is the list that invoked the delegate, SelectedIndex is the new selection index, PlayerIndex is the index within Engine.GamePlayers pointing to the player who triggered the event.
- OnSelectionChange(UTSimpleImageList SourceList, int NewSelectedIndex) - This is called when the selection index changes. SourceList is the list that invoked the delegate, NewSelectedIndex is the new selection index.
UTSIMPLELIST
- bool OnDrawItem(UTSimpleList SimpleList, int ItemIndex, float XPos, out float Ypos) - This is called when the item is going be drawn. SimpleList is the list that invoked the delegate, ItemIndex is an index into the List array, Xpos is the x coordinate to draw the item, Ypos is the y coordinate to draw the item. Return false to render the item using the default method.
- bool OnDrawSelectionBar(UTSimpleList SimpleList, float Ypos) - This is called when the selection bar is going to be drawn. SimpleList is the list that invoked the delegate, Ypos is the y coordinate to draw the item. Return false to draw the selection bar using the default method.
- bool OnPostDrawSelectionBar(UTSimpleList SimpleList, float YPos, float Width, float Height) - This is called after the selection bar is drawn. SimpleList is the list that invoked the delegate, Ypos was the y coordinate the selection bar was drawn at, Width was the width the selection bar was drawn at, Height was the height the selection bar was drawn at. Return value is not used.
- OnItemChosen(UTSimpleList SourceList, int SelectedIndex, int PlayerIndex) - This is called when an item within the list has been chosen. SourceList is the list that invoked the delegate, SelectedIndex is the new selection index, PlayerIndex is the index within Engine.GamePlayers pointing to the player who triggered the event.
- OnSelectionChange(UTSimpleList SourceList, int NewSelectedIndex) - This is called when the selection index changes. SourceList is the list that invoked the delegate, NewSelectedIndex is the new selection index.
UTSKELCONTROL_CANTILEVERBEAM
- vector EntireBeamVelocity() - This returns the speed the entire beam is travelling at.
UTSKELCONTROL_TURRETCONSTRAINED
- OnTurretStatusChange(bool bIsMoving) - This is called when the turrets status has changed. bIsMoving is set true if the turret is considered to be moving.
UTSLOWVOLUME
- OnDeployableUsedUp(actor ChildDeployable) - This is the same as UTGame.UTDeployedActor.OnDeployableUsedUp().
UTTABPAGE.UC
- OnTick(float DeltaTime) - This is called on each tick. DeltaTime is the time, in seconds, between each tick event.
UTUIFRONTEND_BINDKEYS360
- MarkDirty() - This is called to mark the profile as dirty.
UTUIFRONTEND_BINDKEYSPC
- MarkDirty() - This is called to mark the profile as dirty.
UTUIFRONTEND_BINDKEYSPS3
- MarkDirty() - This is called to mark the profile as dirty.
UTUIFRONTEND_BOTSELECTION
- OnAcceptedBots() - This is called when the user accepts their current bot selection set.
UTUIFRONTEND_SETTINGSPANELS
- OnMarkProfileDirty(optional bool bDirty = true) - This is called when the profile has been modified by something other than the user changing the value of an option. Set bDirty true to mark the profile as dirty.
- OnNotifyOptionChanged(UIScreenObject InObject, name OptionName, int PlayerIndex) - This is called when the user changes one of the options in an option list. InObject is the UIScreenObject that invoked this delegate, OptionName is the name of the option changed, PlayerIndex is the index within Engine.GamePlayers pointing to the player who triggered the event. - UTUIFRONTEND_WEAPONPREFERENCE
- MarkDirty() - This is called to mark the profile as dirty.
UTUIMENULIST
- OnSubmitSelection(UIObject Sender, optional int PlayerIndex = GetBestPlayerIndex()) - This is called when the user presses enter or any other action button bound to UIKey_SubmitListSelection while this list has focus. Sender is the UIObject that invoked this delegate, PlayerIndex is the index within Engine.GamePlayers pointing to the player who triggered the event.
UTUIOPTIONLIST
- OnOptionFocused(UIScreenObject InObject, UIDataProvider OptionProvider) - This is called when an option gains focus. InObject is the UIScreenObject which invoked this delegate, OptionProvider is the data provider for the option.
- OnOptionChanged(UIScreenObject InObject, name OptionName, int PlayerIndex) - This is called when an option has changed. InObject is the UIScreenObject which invoked this delegate, PlayerIndex is the index within Engine.GamePlayers pointing to the player who triggered the event.
- OnAcceptOptions(UIScreenObject InObject, int PlayerIndex) - This is called when the accept button was pressed on the option list. InObject is the UIScreenObject which invoked this delegate, PlayerIndex is the index within Engine.GamePlayers pointing to the player who triggered the event.
UTUIPANEL_MAPCYCLE
- OnMapSelected() - This is called when the user selects a map on this page.
UTUIPANEL_SINGLEMAP
- OnMapSelected() - This is called when the user selects a map on this page.
UTUIPRESSBUTTON
- OnBeginPress(UIScreenObject InObject, int InPlayerIndex) - This is called when the user just pressed the button. InObject is the UIScreenObject that invoked this delegate, InPlayerIndex is the index within Engine.GamePlayers pointing to the player who triggered the event.
- OnEndPress(UIScreenObject InObject, int InPlayerIndex) - This is called when the user just released the left mouse button on the button. InObject is the UIScreenObject that invoked this delegate, InPlayerIndex is the index within Engine.GamePlayers pointing to the player who triggered the event.
UTUISCENE
- OnShowAnimationEnded() - This is called when the scene's show animation has ended.
- OnHideAnimationEnded() - This is called when the scene's hide animation has ended.
- OnSceneOpened(UIScene OpenedScene, bool bInitialActivation) - This is called when the scene has opened after hiding the top most scene. OpenedScene is the scene that invoked this delegate, bInitialActivation is set true if this is the first time the opened scene has been activated.
UTUISCENE_MESSAGEBOX
- OnSelection(UTUIScene_MessageBox MessageBox, int SelectedOption, int PlayerIndex) - This is called when the user has made a selection from the choices available to them. MessageBox is the UTUIScene_MessageBox that invoked this function, SelectionOption is the selection chosen, PlayerIndex is the index within Engine.GamePlayers pointing to the player who triggered the event.
- OnClosed() - This is called after the message box has been completely closed.
- bool OnMBInputKey(const out InputEventParameters EventParms) - This is called when any input has been received by the message box. EventParams contains information about the input event. Return true if the input has been processed and does not require any more processing.
UTUISCENE_SAVEPROFILE
- OnSaveFinished() - This is called when the profile has finished saving.
UTUITABPAGE_CHARACTERPART
- transient OnPartSelected(ECharPart PartType, string InPartID) - This is called when the user selects a part on this page. PartType contains information about the part that was selected, PartID is the ID of said PartType.
- transient OnPreviewPartChanged(ECharPart PartType, string InPartID) - This is called when the user changes the selected part on this page. PartType contains information about the part that was selected, PartID is the ID of said PartType.
UTUITABPAGE_FINDQUICKMATCH
- OnSearchComplete(bool bWasSuccessful) - This is called when the search has completed. bWasSuccessful is set true if the asynchronous call completed successfully.
UTUITABPAGE_GAMEMODESELECTION
- OnGameModeSelected(string InGameMode, string InDefaultMap, string GameSettingsClass, bool bSelectionSubmitted) - This is called when the game mode gets selected from this page. InGameMode is the game mode selected, InDefaultMap is the default map for the game mode selected, GameSettingsClass is the class name of the game settings, bSelectionSubmitted is true if the selection was submitted.
UTUITABPAGE_MAPSELECTION
- OnMapSelected() - This is called when the user selects a map on this page.
UTUITABPAGE_MUTATORS
- OnAcceptMutators(string InEnabledMutators) - This is called when the user accepts the current set of mutators. InEnabledMutators is the list of mutators that have been accepted.
UTUITABPAGE_OPTIONS
- OnAcceptOptions(UIScreenObject InObject, int PlayerIndex) - This is called when the current options have been accepted. InObject is the UIScreenObject that invoked this delegate, PlayerIndex is the index within Engine.GamePlayers pointing to the player who triggered the event.
- OnOptionChanged(UIScreenObject InObject, name OptionName, int PlayerIndex) - This is called when one of the options on the page has changed. InObject is the UIScreenObject that invoked this delegate, OptionName is the name of the option, PlayerIndex is the index within Engine.GamePlayers pointing to the player who triggered the event.
- OnOptionFocused(UIScreenObject InObject, UIDataProvider OptionProvider) - This is called when one of the options gains focus. InObject is the UIScreenObject that invoked this delegate, OptionProvider is the data provider of the option that gained focus.
UTUITABPAGE_SERVERBROWSER
- transient OnBack() - This is called when the user wants to go back.
- transient OnSwitchedGameType() - This is called when the user changes the game type using the combo box.
- transient OnPrepareToSubmitQuery(UTUITabPage_ServerBrowser Sender) - This is called when the user is about to submit a server query. Sender is the UTUITabPage_ServerBrowser that invoked this delegate.
UTUITABPAGE_SERVERFILTER
- transient OnSwitchedGameType() - This is called when the user changes the game type.
TUTORIAL 12.1 - RANDOM EVENT MUTATOR, PART I: INTRODUCTION & INITIAL CLASS SETUP
Over this series of these tutorials, you will be creating a mutator which will create random events for the players in the match. 1. Open up your favorite text editor and create a new file called UTMutator_RandomEvents.uc. 2. Start by declaring the class for the script. Since we are making a mutator, we will subclass Mutator class found in Engine. Your first line should like this:class UTMutator_RandomEvent extends UTMutator;3. Before continuing, we need to think of events that will make Unreal Tournament 3 more interesting. To save you some time, here are some that I have come up with.
- All players receive a redeemer.
- Check all the players and see if their current health is above 50 and if it is, give them some armor.
- Force re spawning of all the items on the map.
defaultproperties
{
   Name=”Default__UTMutator_RandomEvent”
}
You can now compile this class.
TUTORIAL 12.2 - RANDOM EVENT MUTATOR, PART II: TIMING LOGIC
From here we need to write the timing code. The mutator itself is responsible for triggering a random event every 60 seconds. 1. To start off with, we will override the PostBeginPlay() function. Remember that PostBeginPlay() is called when the level is initialized and ready to go, just before the game has started but after the game has loaded.
function PostBeginPlay()
{
   super.PostBeginPlay();
}
2. We will use a timer to trigger the random events.
function PostBeginPlay()
{
   super.PostBeginPlay();
   SetTimer(60.f, true);
}
3. Then create a new function called Timer, and write it out like so:
function Timer()
{
}
When the mutator calls PostBeginPlay(), it will create and assign a new timer that will trigger every 60 seconds. The true argument is provided so that the timer will loop continuously until we tell it to stop. By default SetTimer() will call a function named Timer() within the instance that it was called from.
TUTROIAL 12.3 - RANDOM EVENT MUTATOR, PART III: USING DELEGATES
1. Now we create our delegate function, and modify our Timer function.
delegate RandomEvent();

function Timer()
{
   RandomEvent();
}
When the Timer() function is called, we will call our delegate RandomEvent().
2. From here, we will create the three functions which handle the logic of each random event as described above. We will also handle the logic to alter which event gets run as well.
function GiveBonusArmor()
{
}

function GiveRedeemerToAll()
{
}

function ForceRespawn()
{
}
3. And we shall now alter our Timer() function which handles the random selection of events.
function Timer()
{
   switch (Rand(3))
   {
      case 0:
         RandomEvent = GiveBonusArmor;
         break;

      case 1:
         RandomEvent = GiveRedeemerToAll;
         break;

      case 2:
         RandomEvent = ForceRespawn;
         break;

      default:
         RandomEvent = GiveBonusArmor;
         break;
   }

   RandomEvent();
}
As you can see, when ever Timer() gets called, we will run a random call within a switch. Depending on the results of the randomization, we will then assign RandomEvent() to one of the functions. We then call RandomEvent(), which will in turn calls the function that we've assigned the delegate to.
TUTORIAL 12.4 - RANDOM EVENT MUTATOR, PART IV: GIVEBONUSARMOR()
1. Within the WorldInfo instance, there is an iterator function which allows us to iterate through all the existing pawns in the world. We will use this iterator to find all of the player pawns within the map. Let's modify the GiveBonusArmor() function, like so:
function GiveBonusArmor()
{
   local UTPawn P;

   foreach WorldInfo.AllPawns(class'UTPawn', P)
   {
   }
}
Thus, when the GiveBonusArmor() function is run, it will start by iterating through all the pawns in the level that are of class UTPawn or a child class of UTPawn and output the result into our local variable P.
2. So now, we need to filter out the pawns we get from the iterator to match the conditions that we want. The conditions were that pawns must have over 50 health in order to be given the bonus armor reward. Thus, we add the conditional if statement in, like so:
function GiveBonusArmor()
{
   local UTPawn P;

   foreach WorldInfo.AllPawns(class'UTPawn', P)
   {
      if (P != none && P.Health >= 50)
      {
      }
   }
}
Even though P should usually never be none when returned by the iterator, it is still good practice to check for none every time. This is a good habit to get into since the check does not cost that much and will prevent access none errors. Once we have checked for none, we then check that health of the pawn.
3. In Unreal Tournament 3, there are three types of armor that players can have. We can reward the player more armor when he has more health.
function GiveBonusArmor()
{
   local UTPawn P;

   foreach WorldInfo.AllPawns(class'UTPawn', P)
   {
      if (P != none && P.Health >= 50)
      {
         P.ThighpadArmor = Max(class'UTArmorPickup_Thighpads'.default.ShieldAmount, P.ThighpadArmor);

         if (P.Health >= 80)
            P.VestArmor = Max(class'UTArmorPickup_Vest'.default.ShieldAmount, P.VestArmor);

         if (P.Health >= 90)
            P.HelmetArmor = Max(class'UTArmorPickup_Helmet'.default.ShieldAmount, P.HelmetArmor);
      }
   }
}
Thus we will always give players some thigh pads if they meet the first requirement of having over 50 health. If their health is above 80, then we reward some vest armor as well, and lastly, if their health is above 90, then we reward some helmet armor as well.
4. Let's add some sound as well so that the player that received the bonus can hear something as well. Let's alter the function like so:
function GiveBonusArmor()
{
   local UTPawn P;
   local SoundCue S;

   foreach WorldInfo.AllPawns(class'UTPawn', P)
   {
      if (P != none && P.Health >= 50)
      {
         P.ThighpadArmor = Max(class'UTArmorPickup_Thighpads'.default.ShieldAmount, P.ThighpadArmor);
         S = class'UTArmorPickup_Thighpads'.default.PickupSound;

         if (P.Health >= 80)
         {
            P.VestArmor = Max(class'UTArmorPickup_Vest'.default.ShieldAmount, P.VestArmor);
            S = class'UTArmorPickup_Vest'.default.PickupSound;
         }

         if (P.Health >= 90)
         {
            P.HelmetArmor = Max(class'UTArmorPickup_Helmet'.default.ShieldAmount, P.HelmetArmor);
            S = class'UTArmorPickup_Helmet'.default.PickupSound;
         }

         if (S != none)
            P.PlaySound(S);
      }
   }
}
We added a local SoundCue variable, so we can set it when we give the armor. As the player meets the various requirements, the SoundCue gets set to the one we would like to play in the end. Lastly, we check if there was a sound cue assigned to our variable S (remember default variables do not necessarily have to hold a value other than none) and if there was we ask our bonused pawn to play the sound.
TUTORIAL 12.5 - RANDOM EVENT MUTATOR, PART V: GIVEREDEEMERTOALL
1. Much like the GiveBonusArmor() function, this function too will start off with the function iterating through all of the pawns within the world. So let's start with that:
function GiveRedeemerToAll()
{
   locale UTPawn P;

   foreach WorldInfo.AllPawns(class'UTPawn', P)
   {
   }
}
2. Since all players just receive a redeemer, we don't need to actually write any conditions at all. We simply just give every one a redeemer. In order to do that, we would need to spawn a redeemer inventory item and then give it to each pawn. So, we need to spawn the redeemer and hold a reference in a variable so we can use it. So we'll modify the function, like so:
function GiveRedeemerToAll()
{
   local UTPawn P;
   local UTWeap_Redeemer_Content R;

   foreach WorldInfo.AllPawns(class'UTPawn', P)
   {
      R = Spawn(class'UTWeap_Redeemer_Content');
   }
}
That won't quite accomplish much though. That'll just spawn redeemers in the middle of no where, where perhaps one lucky person might stumble across them all (although probably not, since players pick up weapon pick ups and not the weapon itself!).
3. So now that we've spawned a redeemer, we need to give it to a player. First of all, we should in fact check if there is indeed a player to give the redeemer to. Since we will check for a pawn's existence, we may as well check if it is a valid pawn too. Lastly, we might as well spawn the redeemer with the appropriate parameters.
function GiveRedeemerToAll()
{
   local UTPawn P;
   local UTWeap_Redeemer_Content R;

   foreach WorldInfo.AllPawns(class'UTPawn', P)
   {
      if (P != none && P.bCanPickupInventory && P.Health > 0 && P.Controller != none)
         R = Spawn(class'UTWeap_Redeemer_Content', P,, P.Location, P.Rotation);
   }
}
The conditionals look pretty complex, so let's walk through them:
- Is P none or not?
- Is P able to pickup inventory items or not?
- Does P have any health?
- Does P have a valid controller?
function GiveRedeemerToAll()
{
   local UTPawn P;
   local UTWeap_Redeemer_Content R;

   foreach WorldInfo.AllPawns(class'UTPawn', P)
   {
      if (P != none && P.bCanPickupInventory && P.Health > 0 && P.Controller != none)
      {
         R = Spawn(class'UTWeap_Redeemer_Content', P,, P.Location, P.Rotation);

         if (R != none)
         {
            if (WorldInfo.Game.PickupQuery(P, class'UTWeap_Redeemer_Content', R))
               R.GiveTo(P);
            else
               R.Destroy();
         }
      }
   }
}
Again we check to see if R was actually spawned or not. Sometimes a spawn can fail for various reasons, so it is possible that R could be none. To avoid any access none errors, we check for the validity of R. We finally do one last check, and the check verifies whether the pawn is able to pick up a redeemer or not. If the pawn is able to, then we give it to the pawn, otherwise we destroy the spawned redeemer.
TUTORIAL 12.6 - RANDOM EVENT MUTATOR, PART VI: FORCERESPAWN
1. One of the first things we should do, is to create a dynamic array and fill it up with pickup factory references. So, let's begin by adding a global dynamic array to our mutator class.class UTMutator_RandomEvent extends UTMutator; private var array<UTPickupFactory> PickupFactories;The reason why we make this global variable private is that we don't really want other classes to be able to alter the array. 2. Now that we have a global variable to store pickup factory references, we then alter PostBeginPlay() so that we fill up this dynamic array.
function PostBeginPlay()
{
   local UTPickupFactory pickup_factory;

   super.PostBeginPlay();
   SetTimer(60.f, true);

   foreach AllActors(class'UTPickupFactory', pickup_factory)
   {
   }
}
This will now iterate the entire level for all actors that are either a UTPickupFactory or a subclass of it.
3. Within this iteration we should store each result after validating it.
function PostBeginPlay()
{
   local UTPickupFactory pickup_factory;

   super.PostBeginPlay();
   SetTimer(60.f, true);

   foreach AllActors(class'UTPickupFactory', pickup_factory)
   {
      if (pickup_factory != none)
         PickupFactories.AddItem(pickup_factory);
   }
}
Now we have setup a dynamic array of pick up factories for us to use. The reason why we do this, is because the AllActors iterator is quite slow. And doing it every time we want to force respawn is pointless.
4. Now we write our ForceRespawn function.
function ForceRespawn()
{
   local int i;

   for (i = 0; i < PickupFactories.length; ++i)
   {
   }
}
5. And finally we tell all of the pickup factories to reset themselves.
function ForceRespawn()
{
   locale int i;

   for (i = 0; i < PickupFactories.length; ++i)
      if (PickupFactories[i] != none)
         PickupFactories[i].Reset();
}
TUTORIAL 12.7 - RANDOM EVENT MUTATOR, TESTING
1. Compile the code, and then start up Unreal Tournament 3. 2. Log in or choose to play offline. 3. Then, select an Instant Action game. 4. Choose Deathmatch as the gametype and select any map you choose. 5. Go to the Settings panel and press the Mutators button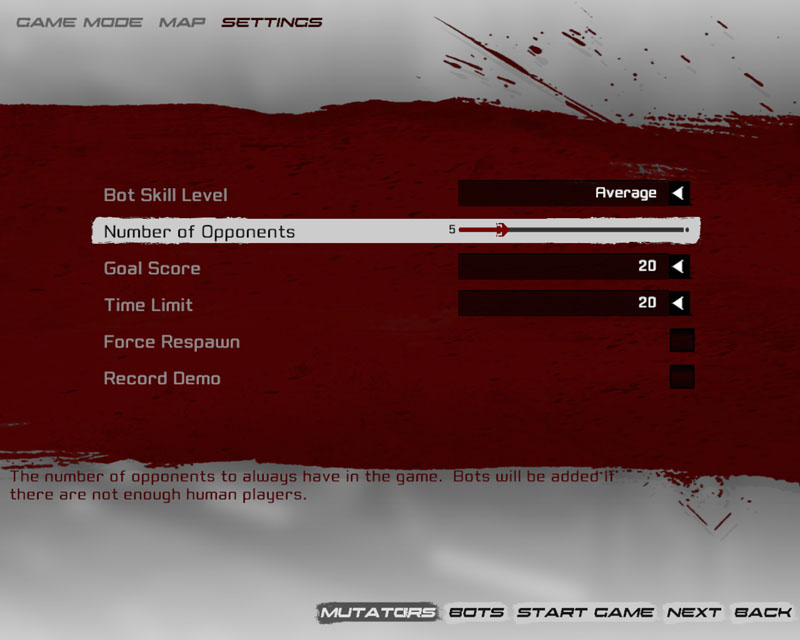
Figure 12.1 – The Mutators button takes you to the Mutator selection and configuration screen. 6. Add the UTMutator_RandomEvent mutator to the list of Enabled Mutators.

Figure 12.2 – The mutator is has been added. 7. Wait for a while and you may get one of the three random events occurring. In this case, the shield reward was given.

Figure 12.3 – The shield reward has been given to the player. In this tutorial we looked at how to create and use delegates in a single instance. In this situation it's very easy to extend this Mutator to make more events that could occur over time. Since we don't need to worry too much about the maintenance of the timing logic, this is quite a flexible way of doing things.
TUTORIAL 12.8 - WEAPON MUTATOR, PART I: INTRODUCTION & INITAL CLASS SETUP
In this tutorial we will be making a weapon which the player can change the fire type. Each fire type mimics an existing weapon being the rocket launcher, flak cannon, shock rifle and the bio rifle. The rocket launcher style results in an instant hit explosive. The flak cannon results in an instant hit explosive that also launches some flak. The shock rifle style results in an instant hit shock combo. The bio rifle style results in an instant hit goo explosive that also drops some goo blobs. 1. Start by creating new Unrealscript files in the ..\MasteringUnrealScript\Classes folder called UTWeap_MultiEnforcer.uc, MultiEnforcer_Base.uc, MultiEnforcer_Bio.uc, MultiEnforcer_Flak.uc, MultiEnforcer_Rocket.uc and MultiEnforcer_Shock.uc. 2. Declare our class and default properties for UTWeap_MultiEnforcer. We are sub classing from UTWeap_Enforcer as we want to do as little work as possible in setting up a new weapon.
class UTWeap_MultiEnforcer extends UTWeap_Enforcer

defaultproperties
{
   Name=”Default__ UTWeap_MultiEnforcer”
}
3. Declare our class and default properties for MultiEnforcer_Base.
class MultiEnforcer_Base extends Object;

defaultproperties
{
   Name=”Default__MultiEnforcer_Base"
}
4. Declare our class and default properties for MultiEnforcer_Bio. We are sub classing from MultiEnforcer_Base because the base functionality is handled within MultiEnforcer_Base.
class MultiEnforcer_Bio extends MultiEnforcer_Base;

defaultproperties
{
   Name="Default__MultiEnforcer_Bio"
}
5. Declare our class and default properties for MultiEnforcer_Flak.
class MultiEnforcer_Flak extends MultiEnforcer_Base;

defaultproperties
{
   Name="Default__MultiEnforcer_Flak"
}
6. Declare our class and default properties for MultiEnforcer_Rocket.
class MultiEnforcer_Rocket extends MultiEnforcer_Base;

defaultproperties
{
   Name="Default__MultiEnforcer_Rocket"
}
7. Declare our class and default properties for MultiEnforcer_Shock.
class MultiEnforcer_Shock extends MultiEnforcer_Base;

defaultproperties
{
   Name="Default__MultiEnforcer_Shock"
}
8. Save all of the new scripts.
TUTORIAL 12.9 - WEAPON MUTATOR, PART II: SETTING UP UTWEAP_MULTIENFORCER
This class represents the weapon itself, and handles almost everything related to the weapon. This includes the visuals such as displaying the mesh so it looks like the weapon is being held by the player, the sound effects created by the weapon and the management of weapon firing and so forth. Since we have sub classed from UTWeap_Enforcer the majority of the work has already been done for us. This gives us a lot of time to focus on just changing the behavior of the weapon to what we'd like to do with it. 1. This weapon is going to be dependent on the four firing classes, MultiEnforcer_Bio, MultiEnforcer_Flak, MultiEnforcer_Rocket and MultiEnforcer_Shock. Since they all are subclasses of MultiEnforcer_Base, we can just set the dependency to MultiEnforcer_Base.class UTWeap_MultiEnforcer extends UTWeap_Enforcer dependson(MultiEnforcer_Base);2. We will need to hold a few global variables to store data about our fire types.
var private array<MultiEnforcer_Base> FireTypes;
var private int CurrentIndex;
var const array< class<MultiEnforcer_Base> > FireTypeClasses;
FireTypes is a private array which will hold object instances of MultiEnforcer_Base. FireTypes can also hold any child classes of MultiEnforcer_Base as well. FireTypes is private because we want to block access to other classes. CurrentIndex is an integer which holds what the current index within FireTypes. We use CurrentIndex to set which fire type the player wants to use. CurrentIndex is private because we want to block access to other classes. FireTypeClasses is an array which holds the classes of fire types that the weapon is able to use. FireTypeClasses is constant because this array doesn't need to be modified during run time. Note the spaces between the >'s. This space is required as the Unrealscript compiler will generate an error otherwise. 3. Let's add some definitions to our default properties.
defaultproperties
{
   CurrentIndex=0
   FireTypeClasses(0)=class'MultiEnforcer_Rocket'
   FireTypeClasses(1)=class'MultiEnforcer_Shock'
   FireTypeClasses(2)=class'MultiEnforcer_Flak'
   FireTypeClasses(3)=class'MultiEnforcer_Bio'
   InventoryGroup=3
   ItemName="MultiEnforcer"
   PickupMessage="MultiEnforcer"
   FiringStatesArray(1)="WeaponSwitching"
   Name="Default__UTWeap_MultiEnforcer"
   ObjectArchetype=UTWeap_Enforcer'UTGame.Default__UTWeap_Enforcer'
}
CurrentIndex is initially set to zero. FireTypeClasses has all of the array items defined here as it is constant during run time. InventoryGroup is a variable that is defined in the parent class, and it determines which group this weapon is in. ItemName is the name of the weapon. PickupMessage is the message given when picking up the weapon, in this case we just call it MultiEnforcer anyways. FiringStatesArray are the list of state names that a weapon will initiate when firing a fire mode. We will make a new secondary firing state called WeaponSwitching, hence why we have put it in here. Name is the name of this object, which we can reference to in other classes. ObjectArchetype is this object's parental class from which we can derive most of our other default properties from.
4. Let's start by writing our PostBeginPlay() function which will handle the initial setup of the weapon.
function PostBeginPlay()
{
   super.PostBeginPlay();
}
5. For this weapon to work properly, we will need to create instances of our fire type objects within PostBeginPlay().
function PostBeginPlay()
{
   local int i;

   super.PostBeginPlay();

   if (FireTypeClasses.length > 0)
   {
      for (i = 0; i < FireTypeClasses.length; ++i)
         if (FireTypeClasses[i] != none)
            FireTypes.AddItem(new FireTypeClasses[i]);
   }
}
We first check if the FireTypeClasses array has any items in it. If there aren't any, theres no real reason to carry on is there? From there, we just iterate through the array and create new object instances of each fire type while adding them into our FireTypes array. We use the keyword new here, as these classes are ultimately derived from object and not Actor (which we would then use Spawn()).
6. Because we will eventually bind to our fire type objects using delegates, we will need to clean that up in way that won't leak memory. Refer to 12.5 where delegates and memory was discussed. So we will also override the Destroyed() function. Destroyed() is called automatically when the instance has been destroyed using Destroy(), or when the instance is destroyed by Unreal Engine.
simulated function Destroyed()
{
   super.Destroyed();
}
7. Since we cannot destroy object instances, all we need to do is to remove any references to them so that Unreal Engine can garbage collect them and then delete them from memory.
simulated function Destroyed()
{
   local int i;

   super.Destroyed();

   if (FireTypes.length > 0)
   {
      for (i = 0; i < FireTypes.length; ++i)
         FireTypes[i] = none;
   }
}
8. Now that we've handled the issue of memory, we then progress to altering the way the weapon will fire. The Enforcer is set as an hit scan weapon, thus it will call ProcessInstantHit() when the weapon has completed a trace. We override this, to have add new logic to how our weapon will act when a hit needs to be processed.
simulated function ProcessInstantHit(byte FiringMode, ImpactInfo Impact)
{
}
In this particular case, we do not add a super call here because we do not require the parents logic to occur.
9. Let's declare our delegate now. This delegate will be called when the weapon needs to process a hit.
delegate OnProcessInstantHit(UTWeapon Weapon, byte FiringMode, ImpactInfo Impact);

simulated function ProcessInstantHit(byte FiringMode, ImpactInfo Impact)
{
   OnProcessInstantHit(self, FiringMode, Impact);
}
10. Now that we have handled what happens when this weapon is fired, we can now tackle the task of adding the code which handles how the player changes between fire types. Remember in our default properties when we added a line that changed the second firing state to WeaponSwitching? This default property is the name of the state the weapon goes in when the secondary fire mode is activated. Since this is typically bound to the right mouse button, we will use this to handle how the player changes between fire types.
simulated state WeaponSwitching
{
}
11. We will need to do some house keeping inside this state, so we'll just add in the same subset of functions inside WeaponBursting inside UTWeap_Enforcer.
simulated state WeaponSwitching
{
   simulated function TrackShotCount();

   simulated function RefireCheckTimer();

   simulated function bool TryPutDown()
   {
      bWeaponPutDown = true;
      return true;
   }
}
12. Weapons use timers to handle animation. Timers allow us to create an event based architecture inside Unrealscript without having to resort to expensive tracking within Tick() for example. What we would like to happen when a player changes fire type, is for the player to put down his enforcer and then reload it again by putting in a new clip. Luckily for us, Unreal Tournament 3 has such an animation with the enforcer.
simulated state WeaponSwitching
{
   simulated function TrackShotCount();

   simulated function RefireCheckTimer();

   simulated function bool TryPutDown()
   {
      bWeaponPutDown = true;
      return true;
   }

   simulated function BeginState(name PrevStateName)
   {
      TimeWeaponPutDown();
   }
}
TimeWeaponPutDown() is a function that exists in the parent classes. It sets a timer to trigger as well as playing the weapon put down animation. This function is implemented within UTWeapon and Weapon. In short, it handles the animation for putting down the weapon, and when the animation is finished, WeaponIsDown() will be called.
13. Now that we know that WeaponIsDown() will be triggered once the weapon has been put down, we then want the weapon to come back up with a reloading animation. During this stage, we need to also handle the fire type changing state.
simulated state WeaponSwitching
{
   simulated function TrackShotCount();
   simulated function RefireCheckTimer();

   simulated function bool TryPutDown()
   {
      bWeaponPutDown = true;
      return true;
   }

   simulated function WeaponIsDown()
   {
      ClearTimer('WeaponIsDown');
      bLoaded = false;
      TimeWeaponEquipping();
      CurrentIndex++;

      if (CurrentIndex >= FireTypes.length)
         CurrentIndex = 0;

      AssignFireType();
   }

   simulated function BeginState(name PrevStateName)
   {
      TimeWeaponPutDown();
   }
}
Here we have added a WeaponIsDown() function which is specific for this state. As soon as that function is called, we clear the timer associated with this function. bLoaded is set to false because in UTWeap_Enforcer, when this is set to false the weapon reloading animation is played. We then call TimeWeaponEquipping() which is the same as TimeWeaponPutDown(), in that it will also play an animation and will trigger a function based on a timer. This function is called WeaponEquipped(). We also increment the CurrentIndex variable to shift the index of which fire type we are using. We reset CurrentIndex when it is greater or equal to the length of the FireTypes array. This will create a looping selection system for the player to use. We then call an undefined function called AssignFireType(). I did this portion inside another function because it is possible that we may need to handle assigning the fire type based on CurrentIndex in different places.
14. Finally, once the weapon reloading animation is done, we should then go back into the active state. If we do not do this, then the weapon will be stuck in this state forever and will never be able to fire again.
simulated state WeaponSwitching
{
   simulated function TrackShotCount();
   simulated function RefireCheckTimer();

   simulated function bool TryPutDown()
   {
      bWeaponPutDown = true;
      return true;
   }

   simulated function WeaponIsDown()
   {
      ClearTimer('WeaponIsDown');
      bLoaded = false;
      TimeWeaponEquipping();
      CurrentIndex++;

      if (CurrentIndex >= FireTypes.length)
         CurrentIndex = 0;

      AssignFireType();
   }

   simulated function WeaponEquipped()
   {
      ClearTimer('WeaponEquipped');
      bLoaded = true;
      GotoState('Active');
   }

   simulated function BeginState(name PrevStateName)
   {
      TimeWeaponPutDown();
   }
}
And thus we added a new function called WeaponEquipped() which simply clears the timer associated with it, sets bLoaded to true (this is so that if the player switches to another weapon and switches back to this, we won't replay the reloading animation), and then goes to the Active state.
15. We should now define our AssignFireType() function. All this function does, is check that the CurrentIndex is valid to be used as an index within FireTypes and if the FireType that CurrentIndex is pointing to, is valid or not.
function AssignFireType()
{
   if (CurrentIndex >= 0 && CurrentIndex < FireTypes.length && FireTypes[CurrentIndex] != none && FireTypes[CurrentIndex].WeaponClass != none)
   {
   }
}
16. It's all well and good that we check that, but in order for this to have any real effect we need to assign to our delegate here.
function AssignFireType()
{
   if (CurrentIndex >= 0 && CurrentIndex < FireTypes.length && FireTypes[CurrentIndex] != none && FireTypes[CurrentIndex].WeaponClass != none)
      OnProcessInstantHit = FireTypes[CurrentIndex].OnProcessInstantHit;
}
Remember that when the weapon is first created, even though our CurrentIndex is zero, the weapon hasn't been assigned to any of the fire types. Thus, in our PostBeginPlay() function, we also make a call to AssignFireType() to do this.
simulated function PostBeginPlay()
{
   local int i;

   super.PostBeginPlay();

   if (FireTypeClasses.length > 0)
   {
      for (i = 0; i < FireTypeClasses.length; ++i)
         if (FireTypeClasses[i] != none)
            FireTypes.AddItem(new FireTypeClasses[i]);
   }

   AssignFireType();
}
17. We've now completed all the logic we require. However, we don't really have anything which will inform the player what fire type this weapon is set to. Luckily for us, it appears that Weapon has created hooks for us to use to allow us to draw things onto the HUD.
simulated function ActiveRenderOverlays(HUD H)
{
   super.ActiveRenderOverlays(H);
}
18. To allow the player to know what fire type is selected, we will draw an icon of the weapon that the fire type mimics. Where we will draw this icon is on the HUD where the ammo clip is. This means that we'll need to get the bone location of the ammo clip, project it onto the HUD to get valid HUD coordinates, and then we can render it. First of all, we need to get access to the skeletal mesh component of the first person mesh.
simulated function ActiveRenderOverlays(HUD H)
{
   local SkeletalMeshComponent SkelMesh;

   super.ActiveRenderOverlays(H);

   if (H != none && H.Canvas != none)
   {
      SkelMesh = SkeletalMeshComponent(Mesh);

      if (SkelMesh != none)
      {
      }
   }
}
19. Now that we the skeletal mesh, we get the location of the bone named Bullet5 (If you start Unreal Editor and view the skeletal mesh inside the Animation Editor, you can find out the names of bones in there) and project onto the HUD. Calculating the best width and height by doing a percentage based on the resolution will give us the best results when drawing the icon. After centering the icon based on the position calculated earlier, we then draw the icon on the screen. Weapon classes contain the coordinates of the icon, which itself is stored within a composite icon texture.
simulated function ActiveRenderOverlays(HUD H)
{
   local SkeletalMeshComponent SkelMesh;
   local vector BoneLocation;
   local float i_w;
   local float i_h;
   local color CanvasColor;

   super.ActiveRenderOverlays(H);

   if (H != none && H.Canvas != none)
   {
      SkelMesh = SkeletalMeshComponent(Mesh);

      if (SkelMesh != none)
      {
         BoneLocation = H.Canvas.Project(SkelMesh.GetBoneLocation('Bullet5', 0));
         i_w = H.Canvas.ClipX * 0.05f;
         i_h = H.Canvas.ClipY * 0.05f;

         CanvasColor = H.Canvas.DrawColor;
         H.Canvas.DrawColor =  class'UTHUD'.default.WhiteColor;
         H.Canvas.SetPos(BoneLocation.x - (i_w * 0.5f), BoneLocation.y - (i_h * 0.5f));
         H.Canvas.DrawTile(class'UTHUD'.default.IconHudTexture, i_w, i_h, FireTypes[CurrentIndex].WeaponClass.default.IconCoordinates.U, FireTypes[CurrentIndex].WeaponClass.default.IconCoordinates.V, FireTypes[CurrentIndex].WeaponClass.default.IconCoordinates.UL, FireTypes[CurrentIndex].WeaponClass.default.IconCoordinates.VL);
         H.Canvas.DrawColor = CanvasColor;
      }
   }
}
TUTORIAL 12.10 – WEAPON MUTATOR, PART III: MULTIENFORCER_BASE
The base class itself isn't very complex at all. After all, it's just a base class for other classes to sub class. 1. When UTWeap_MultiEnforcer wants to render the icon on the screen, you'll notice that it asks the fire type for a weapon class. We'll define it as a global constant variable so that the subclasses can define it in their default properties.var const class<UTWeapon> WeaponClass;2. We also need to define the function which UTWeap_MultiEnforcer uses to assign to its delegate.
function OnProcessInstantHit(UTWeapon Weapon, byte FiringMode, ImpactInfo Impact);
TUTORIAL 12.11 – WEAPON MUTATOR, PART IV: MULTIENFORCER_BIO
This is the bio fire type. When the bullet hits anything, it creates a small bio goo explosion and will drop some bio goo. 1. First we set WeaponClass in the default properties.
defaultproperties
{
   WeaponClass=class'UTWeap_BioRifle_Content'
   Name="Default__MultiEnforcer_Bio"
}
2. Now we override the OnProcessInstantHit() function.
function OnProcessInstantHit(UTWeapon Weapon, byte FiringMode, ImpactInfo Impact)
{
}
3. First we need to check if we've got a valid HitActor from the impact.
function OnProcessInstantHit(UTWeapon Weapon, byte FiringMode, ImpactInfo Impact)
{
   if (Impact.HitActor != none)
   {
   }
}
4. Let's start by creating the explosion particle effect.
function OnProcessInstantHit(UTWeapon Weapon, byte FiringMode, ImpactInfo Impact)
{
   local EmitterSpawnable es;

   if (Impact.HitActor != none)
   {
      es = Weapon.Spawn(class'EmitterSpawnable',,, Impact.HitLocation);

      if (es != none)
         es.SetTemplate(ParticleSystem'WP_BioRifle.Particles.P_WP_Bio_Alt_Blob_POP');
   }
}
We use the Weapon to spawn our EmitterSpawnable because the Spawn() function is available within Actor and not Object.
5. Then we add in the explosion sound.
function OnProcessInstantHit(UTWeapon Weapon, byte FiringMode, ImpactInfo Impact)
{
   local EmitterSpawnable es;

   if (Impact.HitActor != none)
   {
      Weapon.PlaySound(SoundCue'A_Weapon_BioRifle.Weapon.A_BioRifle_FireAltImpactExplode_Cue',,,, Impact.HitLocation);
      es = Weapon.Spawn(class'EmitterSpawnable',,, Impact.HitLocation);

      if (es != none)
         es.SetTemplate(ParticleSystem'WP_BioRifle.Particles.P_WP_Bio_Alt_Blob_POP');
   }
}
6. Next we add in some radial damage.
function OnProcessInstantHit(UTWeapon Weapon, byte FiringMode, ImpactInfo Impact)
{
   local EmitterSpawnable es;

   if (Impact.HitActor != none)
   {
      Weapon.PlaySound(SoundCue'A_Weapon_BioRifle.Weapon.A_BioRifle_FireAltImpactExplode_Cue',,,, Impact.HitLocation);
      es = Weapon.Spawn(class'EmitterSpawnable',,, Impact.HitLocation);

      if (es != none)
         es.SetTemplate(ParticleSystem'WP_BioRifle.Particles.P_WP_Bio_Alt_Blob_POP');

      Weapon.HurtRadius(class'UTProj_BioGlob'.default.Damage, class'UTProj_BioGlob'.default.DamageRadius, class'UTProj_BioGlob'.default.MyDamageType, class'UTProj_BioGlob'.default.MomentumTransfer, Impact.HitLocation);
   }
}
7. Lastly we spawn in some bio goo to complete the fire type.
function OnProcessInstantHit(UTWeapon Weapon, byte FiringMode, ImpactInfo Impact)
{
   local int g;
   local UTProj_BioShot NewGlob;
   local EmitterSpawnable es;

   if (Impact.HitActor != none)
   {
      Weapon.PlaySound(SoundCue'A_Weapon_BioRifle.Weapon.A_BioRifle_FireAltImpactExplode_Cue',,,, Impact.HitLocation);
      es = Weapon.Spawn(class'EmitterSpawnable',,, Impact.HitLocation);

      if (es != none)
         es.SetTemplate(ParticleSystem'WP_BioRifle.Particles.P_WP_Bio_Alt_Blob_POP');

      for (g = 0; g < 6; ++g)
      {
         NewGlob = Weapon.Spawn(class'UTProj_BioGlobling',,, Impact.HitLocation);

         if (NewGlob != None)
            NewGlob.Velocity = (FRand() * 150.f) * (VRand() * 0.8f);
      }

      Weapon.HurtRadius(class'UTProj_BioGlob'.default.Damage, class'UTProj_BioGlob'.default.DamageRadius, class'UTProj_BioGlob'.default.MyDamageType, class'UTProj_BioGlob'.default.MomentumTransfer, Impact.HitLocation);
   }
}
TUTORIAL 12.12 - WEAPON MUTATOR, PART V: MULTIENFORCER_FLAK
This is the flak fire type. When the bullet hits anything, it creates a flak shell explosion and sends flak flying all over the place. 1. First we set WeaponClass variable in the default properties.
defaultproperties
{
   WeaponClass=class'UTWeap_FlakCannon'
   Name="Default__MultiEnforcer_Flak"
}
2. Now we override the OnProcessInstantHit() function.
function OnProcessInstantHit(UTWeapon Weapon, byte FiringMode, ImpactInfo Impact)
{
}
3. First we need to check if we've got a valid HitActor from the impact.
function OnProcessInstantHit(UTWeapon Weapon, byte FiringMode, ImpactInfo Impact)
{
   if (Impact.HitActor != none)
   {
   }
}
4. We'll start by adding in the explosion particle effect.
function OnProcessInstantHit(UTWeapon Weapon, byte FiringMode, ImpactInfo Impact)
{
   local EmitterSpawnable es;

   if (Impact.HitActor != none)
   {
      es = Weapon.Spawn(class'EmitterSpawnable',,, Impact.HitLocation);

      if (es != none)
         es.SetTemplate(ParticleSystem'WP_FlakCannon.Effects.P_WP_Flak_Alt_Explosion');
   }
}
We use the Weapon to spawn our EmitterSpawnable because the Spawn() function is available within Actor and not Object.
5. We then add in the sound to be played back.
function OnProcessInstantHit(UTWeapon Weapon, byte FiringMode, ImpactInfo Impact)
{
   local EmitterSpawnable es;

   Weapon.PlaySound(SoundCue'A_Weapon_FlakCannon.Weapons.A_FlakCannon_FireAltImpactExplodeCue',,,, Impact.HitLocation);

   if (Impact.HitActor != none)
   {
      es = Weapon.Spawn(class'EmitterSpawnable',,, Impact.HitLocation);

      if (es != none)
         es.SetTemplate(ParticleSystem'WP_FlakCannon.Effects.P_WP_Flak_Alt_Explosion');
   }
}
6. Next we add in the radial damage.
function OnProcessInstantHit(UTWeapon Weapon, byte FiringMode, ImpactInfo Impact)
{
   local EmitterSpawnable es;

   Weapon.PlaySound(SoundCue'A_Weapon_FlakCannon.Weapons.A_FlakCannon_FireAltImpactExplodeCue',,,, Impact.HitLocation);

   if (Impact.HitActor != none)
   {
      es = Weapon.Spawn(class'EmitterSpawnable',,, Impact.HitLocation);

      if (es != none)
         es.SetTemplate(ParticleSystem'WP_FlakCannon.Effects.P_WP_Flak_Alt_Explosion');
   }

   Weapon.HurtRadius(class'UTProj_FlakShell'.default.Damage, class'UTProj_FlakShell'.default.DamageRadius, class'UTProj_FlakShell'.default.MyDamageType, class'UTProj_FlakShell'.default.MomentumTransfer, Impact.HitLocation);
}
7. Finally, we'll spawn some random flak chunks to go flying all over the place. To do this, we setup a small iterator so that we spawn five flak projectiles.
function OnProcessInstantHit(UTWeapon Weapon, byte FiringMode, ImpactInfo Impact)
{
   local int i;
   local UTProj_FlakShard NewChunk;
   local EmitterSpawnable es;

   if (Impact.HitActor != none)
   {
      Weapon.PlaySound(SoundCue'A_Weapon_FlakCannon.Weapons.A_FlakCannon_FireAltImpactExplodeCue',,,, Impact.HitLocation);

      es = Weapon.Spawn(class'EmitterSpawnable',,, Impact.HitLocation);

      if (es != none)
         es.SetTemplate(ParticleSystem'WP_FlakCannon.Effects.P_WP_Flak_Alt_Explosion');

      for (i = 0; i < 5; ++i)
      {
         NewChunk = Weapon.Spawn(class'UTProj_FlakShard',,, Impact.HitLocation);

         if (NewChunk != None)
         {
            NewChunk.bCheckShortRangeKill = false;
            NewChunk.Init((FRand() * 150.f) * (VRand() * 0.8f));
         }
      }

      Weapon.HurtRadius(class'UTProj_FlakShell'.default.Damage, class'UTProj_FlakShell'.default.DamageRadius, class'UTProj_FlakShell'.default.MyDamageType, class'UTProj_FlakShell'.default.MomentumTransfer, Impact.HitLocation);
   }
}
TUTORIAL 12.13 - WEAPON MUTATOR, PART VI: MULTIENFORCER_ROCKET
This is the rocket fire type. When the bullet hits anything, it creates a powerful explosion. 1. First we set WeaponClass in the default properties.
defaultproperties
{
   WeaponClass=class'UTWeap_RocketLauncher'
   Name="Default__MultiEnforcer_Rocket"
}
2. Now we override the OnProcessInstantHit() function.
function OnProcessInstantHit(UTWeapon Weapon, byte FiringMode, ImpactInfo Impact)
{
}
3. First we need to check if we've got a valid HitActor from the impact.
function OnProcessInstantHit(UTWeapon Weapon, byte FiringMode, ImpactInfo Impact)
{
   if (Impact.HitActor != none)
   {
   }
}
4. Spawn in our explosion particle effect.
function OnProcessInstantHit(UTWeapon Weapon, byte FiringMode, ImpactInfo Impact)
{
   local EmitterSpawnable es;

   if (Impact.HitActor != none)
   {
      es = Weapon.Spawn(class'Engine.EmitterSpawnable',,, Impact.HitLocation, Rotator(Impact.HitNormal));

      if (es != none)
         es.SetTemplate(ParticleSystem'WP_RocketLauncher.Effects.P_WP_RocketLauncher_RocketExplosion');
   }
}
We use the Weapon to spawn our EmitterSpawnable because the Spawn() function is available within Actor and not Object.
5. Next we'll play the big explosion sound.
function OnProcessInstantHit(UTWeapon Weapon, byte FiringMode, ImpactInfo Impact)
{
   local EmitterSpawnable es;

   if (Impact.HitActor != none)
   {
      es = Weapon.Spawn(class'Engine.EmitterSpawnable',,, Impact.HitLocation, Rotator(Impact.HitNormal));

      if (es != none)
         es.SetTemplate(ParticleSystem'WP_RocketLauncher.Effects.P_WP_RocketLauncher_RocketExplosion');

      Weapon.PlaySound(SoundCue'A_Weapon_RocketLauncher.Cue.A_Weapon_RL_Impact_Cue',,,, Impact.HitLocation);
   }
}
6. To complete this fire type, we then do some radial damage.
function OnProcessInstantHit(UTWeapon Weapon, byte FiringMode, ImpactInfo Impact)
{
   local EmitterSpawnable es;

   if (Impact.HitActor != none)
   {
      es = Weapon.Spawn(class'Engine.EmitterSpawnable',,, Impact.HitLocation, Rotator(Impact.HitNormal));

      if (es != none)
         es.SetTemplate(ParticleSystem'WP_RocketLauncher.Effects.P_WP_RocketLauncher_RocketExplosion');

      Weapon.PlaySound(SoundCue'A_Weapon_RocketLauncher.Cue.A_Weapon_RL_Impact_Cue',,,, Impact.HitLocation);
      Weapon.HurtRadius(class'UTProj_Rocket'.default.Damage, class'UTProj_Rocket'.default.DamageRadius, class'UTProj_Rocket'.default.MyDamageType, class'UTProj_Rocket'.default.MomentumTransfer, Impact.HitLocation);
   }
}
TUTORIAL 12.14 - WEAPON MUTATOR, PART VII: MULTIENFORCER_SHOCK
This is the shock fire type. When the bullet hits anything, it creates a powerful shock combo explosion. 1. First we set WeaponClass in the default properties.
defaultproperties
{
   WeaponClass=class'UTWeap_ShockRifle'
   Name="Default__MultiEnforcer_Shock"
}
2. Now we override the OnProcessInstantHit() function.
function OnProcessInstantHit(UTWeapon Weapon, byte FiringMode, ImpactInfo Impact)
{
}
3. First we need to check if we've got a valid HitActor from the impact.
function OnProcessInstantHit(UTWeapon Weapon, byte FiringMode, ImpactInfo Impact)
{
   if (Impact.HitActor != none)
   {
   }
}
4. Let's start by spawning in the combo explosion particle effect.
function OnProcessInstantHit(UTWeapon Weapon, byte FiringMode, ImpactInfo Impact)
{
   if (Impact.HitActor != none)
   {
      Weapon.Spawn(Class'UTGame.UTEmit_ShockCombo',,, Impact.HitLocation);
   }
}
We needed to use Weapon to spawn the particle effect in, because Spawn() is a native function that is in Actor and not Object. Impact is a struct which contains a lot of useful data that we can use. In this case, we used HitLocation.
5. We play the sound now, otherwise having a silent explosion is rather boring.
function OnProcessInstantHit(UTWeapon Weapon, byte FiringMode, ImpactInfo Impact)
{
   if (Impact.HitActor != none)
   {
      Weapon.Spawn(Class'UTGame.UTEmit_ShockCombo',,, Impact.HitLocation);
      Weapon.PlaySound(SoundCue'A_Weapon_ShockRifle.Cue.A_Weapon_SR_ComboExplosionCue',,,, Impact.HitLocation);
   }
}
6. To complete this fire type, we also do some radial damage.
function OnProcessInstantHit(UTWeapon Weapon, byte FiringMode, ImpactInfo Impact)
{
   if (Impact.HitActor != none)
   {
      Weapon.Spawn(Class'UTGame.UTEmit_ShockCombo',,, Impact.HitLocation);
      Weapon.PlaySound(SoundCue'A_Weapon_ShockRifle.Cue.A_Weapon_SR_ComboExplosionCue',,,, Impact.HitLocation);
      Weapon.HurtRadius(class'UTProj_ShockBall'.default.ComboDamage, class'UTProj_ShockBall'.default.ComboRadius, class'UTProj_ShockBall'.default.ComboDamageType, class'UTProj_ShockBall'.default.ComboMomentumTransfer, Impact.HitLocation);
   }
}
By using the class default values we save ourselves a little effort of copying the values over.
TUTORIAL 12.15 - WEAPON MUTATOR, TESTING
1. Start up an instant action death match game. 2. Press 'Tab' to open up the console. From the console, type in 'giveweapon MasteringUnrealScript.UTWeap_Multienforcer'. This command will give the weapon to you.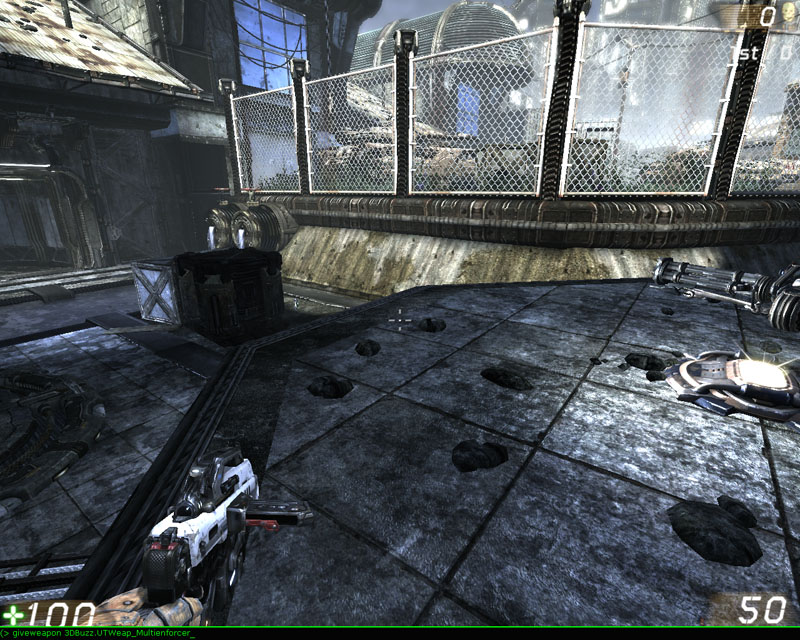
Figure 12.4 – The console command instantly gives the player the desired weapon. 3. You will now have the weapon given to you, so press the 3 key to switch to it.
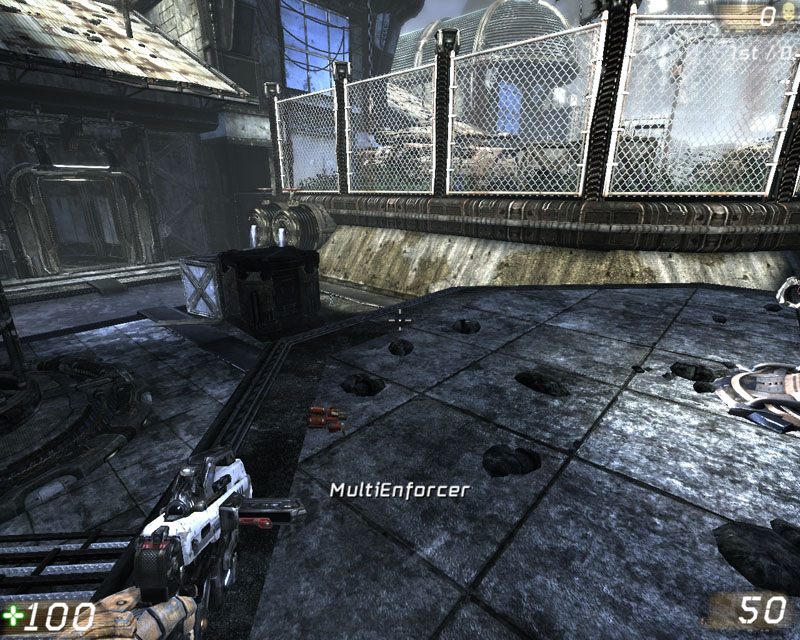
Figure 12.5 – The MultiEnforcer weapon is now active. 4. Now that you've selected the weapon, we can see that a few things are already working. First the HUD icon is appearing informing us that we have the rocket fire type selected. Fire the weapon to make sure.
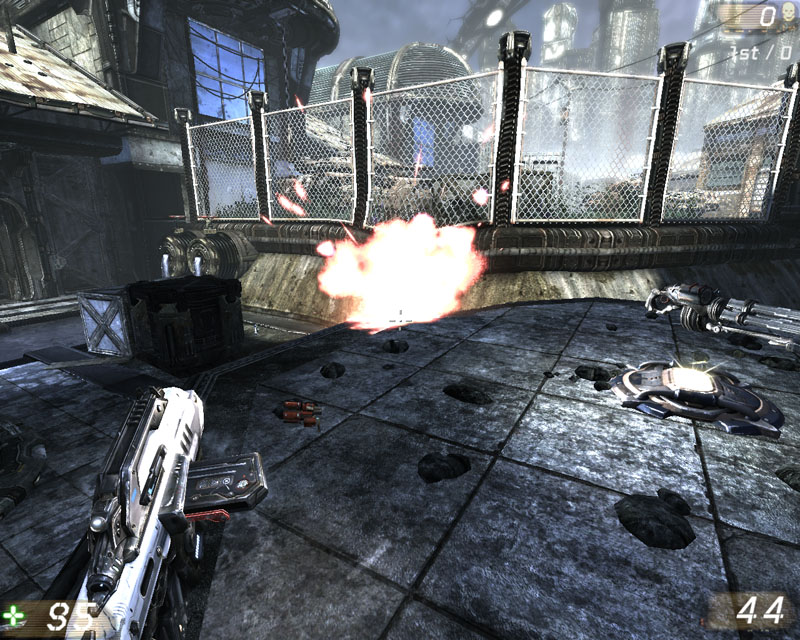
Figure 12.6 – The weapon fires the rocket fire type. 5. Now, let's test the fire type switching functionality. Right click to switch to a different fire type.
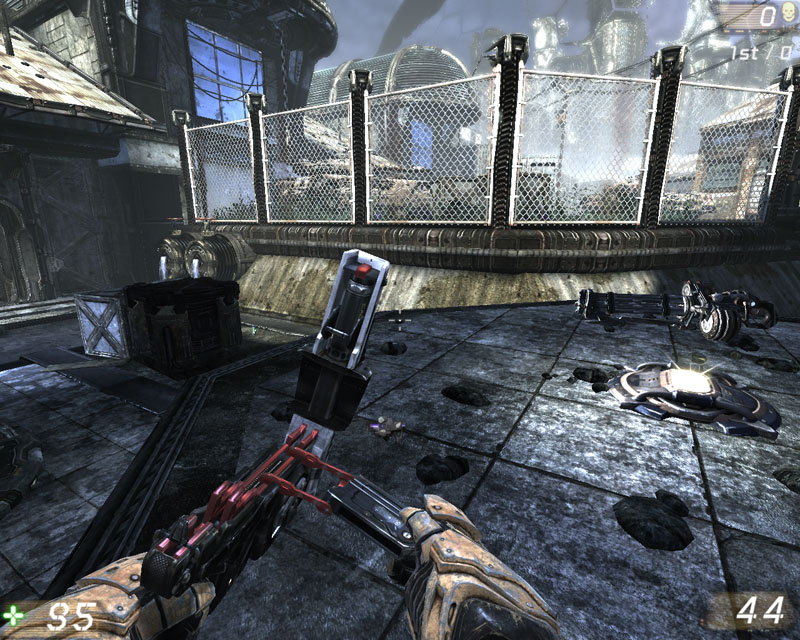
Figure 12.7 – The weapon switches fire types. 6. Great, it looks like we've switched to the shock fire type. Fire to make sure that it is working.
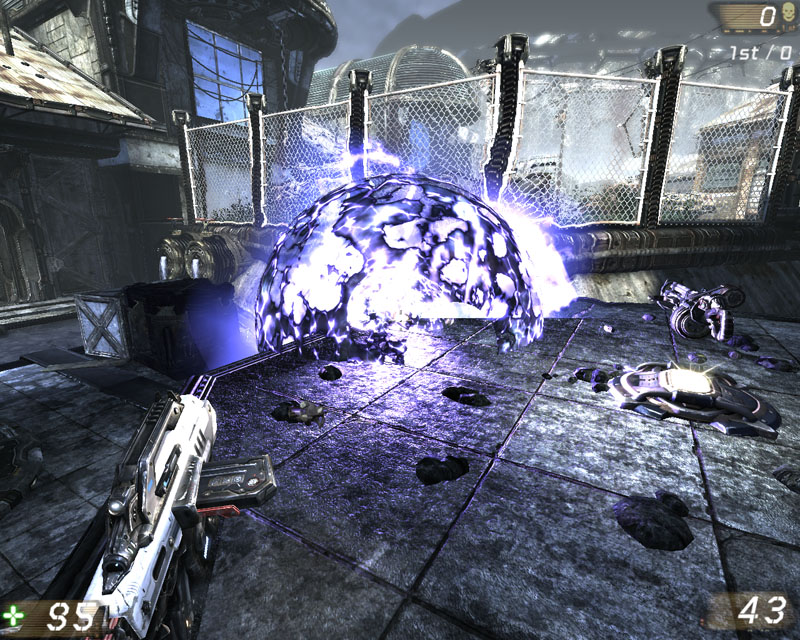
Figure 12.8 – The weapon now fires the shock fire type. In this tutorial you have made a weapon which the player can change between different fire types using the secondary fire button. Using delegates is one way of doing this, but there are of course many other ways of doing it as well. The main lesson to learn from this example is to see how important it is to make sure you clean up references when using delegates with objects.
TUTORIAL 12.16 - DELEGATES & KISMET, PART I: INTRODUCTION & INITIAL CLASS SETUP
In this tutorial we will discuss how to use delegates in a way that can be used within Kismet. Specifically, we will create an effects generator for the level designer. The kismet logic will allow level designers to change the effects that are generated on the fly. The first things we need to think about, is how this will all work on the grand scheme of things. Kismet and level designers are often used to working with placeable actors and brushes, thus we should probably avoid using anything that level designers can't place within the level and tweak. Thus, an effects generator that is placeable, and its effects that are also placeable is probably the best way of handling this. This helps to solve a few things. Level designers can place a single effect generator some where which will define the location and rotation of where to spawn the effects. Level designers can place effects within the map and tweak the effects to achieve the desired effect. Level designers are quite used to this methodology of doing things. We will also need to write a Kismet ready node which allows the level design to set the delegates within the effects generator. Looking at the list of Kismet nodes, there isn't a Kismet node that will 'use' an actor either, so we'll need to make that as well. So, all up, we will have to make the effects generator class, effect base class, set effect Kismet class, use actor Kismet class and classes for the effects we wish to create. For this tutorial we will be making three effects, an explosion, grenades the spawn in a ring formation and a gib spawner. 1. Open up your favorite text editor and create new Unrealscript files in the ..\MasteringUnrealScript\Classes directory called UTEffectsGenerator.uc, UTEffect.uc, SeqAct_SetEffect.uc, SeqAct_Use.uc, UTEffect_Explosion.uc, UTEffect_GrenadeRing.uc and UTEffect_Gibbage.uc. 2. Declare our class and default properties for UTEffectsGenerator.
class UTEffectsGenerator extends Actor
   placeable;

defaultproperties
{
   Name=”Default__UTEffectsGenerator”
}
UTEffectsGenerator is placeable as we would like level designers to be able to place this within their levels.
3. Declare our class and default properties for UTEffect.
class UTEffect extends Actor
   abstract;

defaultproperties
{
   Name=”Default__UTEffect”
}
UTEffect is abstract because we will be creating child classes UTEffect_Explosion, UTEffect_GrenadeRing and UTEffect_Gibbage, and thus UTEffect should never be spawned or placed by level designers or programmers.
4. Declare our class and default properties for SeqAct_SetEffect.
class SeqAct_SetEffect extends SeqAct_SetSequenceVariable;

defaultproperties
{
   VariableLinks(1)=(ExpectedType=Class'Engine.SeqVar_Object',LinkDesc="Effect",PropertyName="Value",MinVars=1,MaxVars=255)
   ObjClassVersion=2
   ObjName="Set Effect"
   ObjCategory=”Effect Generator”
   Name=”Default__ SeqAct_SetEffect”
   ObjectArchetype=SeqAct_SetSequenceVariable'Engine.Default__SeqAct_SetSequenceVariable'
}
SeqAct_SetEffect is a child class of SeqAct_SetSequenceVariable since we are using it in Kismet in a similar way. VariableLinks(1) specifies a link slot that the Kismet editor in Unreal Editor can use. ObjName is the name of the Kismet node that will appear inside the Kismet editor.
5. Declare our class and default properties for SeqAct_Use.
class SeqAct_Use extends SequenceAction;

defaultproperties
{
   ObjName=”Use”
   ObjCategory=”Effect Generator”
   Name=”Default__SeqAct_Use”
   ObjectArchetype=SequenceAction'Engine.Default__SequenceAction'
}
SeqAct_Use is a child class of SequenceAction since we are using it in Kismet in a similar way. ObjName is the name of the Kismet node that will appear inside the Kismet editor, ObjCategory is used for sorting the Kismet nodes within the Kismet editor.
6. Declare our class and default properties for UTEffect_Explosion.
class UTEffect_Explosion extends UTEffect
   placeable;

defaultproperties
{
   Name=”Default_UTEffect_Explosion”
}
UTEffect_Explosion is placeable since we intend this to be placed by level designers.
7. Declare our class and default properties for UTEffect_GrenadeRing.
class UTEffect_GrenadeRing extends UTEffect
   placeable;

defaultproperties
{
   Name=”Default__UTEffect_GrenadeRing”
}
UTEffect_GrenadeRing is placeable since we intend this to be placed by level designers.
8. Declare our class and default properties for UTEffect_Gibbage.
class UTEffect_Gibbage extends UTEffect
   placeable;

defaultproperties
{
   Name=”Default__UTEffect_Gibbage”
}
UTEffect_Gibbage is placeable since we intend this to be placed by level designers.
TUTORIAL 12.17 - DELEGATES & KISMET, PART II: UTEFFECTSGENERATOR
1. We first start by declaring our delegate function that will be used by the effect generator.delegate OnGenerateEffects(UTEffectsGenerator InGenerator);This delegate contains a parameter which holds a reference to a UTEffectsGenerator. In this case, it will always hold a reference to the UTEffectsGenerator that invoked that delegate. This will allow other class instances to have access to who invoked the delegate in the first place 2. Now that we have our delegate function, we'll need to write some of logic that actually calls it.
function GenerateEffects()
{
   OnGenerateEffects(self);
}
The reason why we encapsulate the call to OnGenerateEffects() within GenerateEffects() is for future proofing really. While it doesn't matter right now, if perhaps we wanted a method to disable the effect generation, or whatever else. This means that we only need to adjust GenerateEffects() and thats all, without having to alter the child classes.
3. Now we need a method to call the GenerateEffects() function. In this particular case, we will use the UsedBy() hook that exists within Actor. UsedBy() is called when a player uses the actor by pressing the Use button. In our case though, we just need a common hook so Kismet can interact with it.
function bool UsedBy(Pawn User)
{
   GenerateEffects();
   return super.UsedBy(User);
}
Thus when the effects generator gets used by a player, the effects generator will call GenerateEffects() which then invokes the OnGenerateEffects() delegate.
4. Now we need a way to be able to set the delegate when ever we like.
function SetEffect(delegate<OnGenerateEffects> NewEffect)
{
   OnGenerateEffects = NewEffect;
}
Technically speaking, there wasn't a reason why I had to encapsulate that within a function, since I could access the delegate like a variable from other classes. However, if you were to ever change this delegate into a private or protected delegate, you would have to then alter all of the classes that used the delegate like that.
5. Since a level designer is going to be placing this actor into the world, the level designer is going to need to be able to see the effects generator. Thus we add some rendering components into the default properties that are only visible within the editor.
defaultproperties
{
   Begin Object Class=SpriteComponent Name=Sprite ObjName=Sprite Archetype=SpriteComponent'Engine.Default__SpriteComponent'
      HiddenGame=True
          AlwaysLoadOnClient=False
          AlwaysLoadOnServer=False
          Name="Sprite"
          ObjectArchetype=SpriteComponent'Engine.Default__SpriteComponent'
     End Object
     Components(0)=Sprite

   Begin Object Class=ArrowComponent Name=Arrow ObjName=Arrow Archetype=ArrowComponent'Engine.Default__ArrowComponent'
      ArrowColor=(B=255,G=200,R=150,A=255)
      Name="Arrow"
      ObjectArchetype=ArrowComponent'Engine.Default__ArrowComponent'
   End Object
   Components(1)=Arrow

   Name=”Default__UTEffectsGenerator”
}
TUTORIAL 12.18 - DELEGATES & KISMET, PART III: UTEFFECT
1. The first thing we will need to do is to make sure that UTEffectGenerator is always compiled before this class. Thus we add a dependson(UTEffectsGenerator) to the class definition.class UTEffect extends Actor dependson(UTEffectsGenerator) abstract;2. Now we need to create a function which will act as our stub function for all of the child classes. This stub function will also be used as the delegate override to the delegate that is defined within UTEffectsGenerator.
function Effect(UTEffectsGenerator InGenerator);3. Next we create a function which Kismet will call to set this effect to the effect generator.
function SetEffect(UTEffectsGenerator InGenerator)
{
   if (InGenerator != none)
      InGenerator.SetEffect(Effect);
}
As stated previous, delegate assigning could have been done as InGenerator.OnGenerateEffects = Effect. However, it isn't really that flexible because if the delegate was changed to private or protected, then this class would no longer have access to it. Thus, to be on the safe side an assigning function was used instead.
4. In the same case as UTEffectsGenerator, since the level designer needs to be able to place these within his or her level, we will need to add some rendering components to the default properties.
defaultproperties
{
     Begin Object Class=SpriteComponent Name=Sprite ObjName=Sprite Archetype=SpriteComponent'Engine.Default__SpriteComponent'
      HiddenGame=True
      AlwaysLoadOnClient=False
      AlwaysLoadOnServer=False
      Name="Sprite"
      ObjectArchetype=SpriteComponent'Engine.Default__SpriteComponent'
   End Object
   Components(0)=Sprite

   Name="Default_UTEffect"
}
TUTORIAL 12.19 - DELEGATES & KISMET, PART IV: SEQACT_SETEFFECT
1. Kismet nodes are controlled predominately by native code. However, there are some events that are called by native code which we can use in Unrealscript. In this particular case, the event named Activated() is called by native code when ever the node is activated. Thus we override it to gain access to it.
event Activated()
{
}
2. When Kismet nodes are linked to within the Editor the LinkedVariables (within each VariableLinks) will hold reference to those object variables. These object variables should contain the UTEffectsGenerator and the UTEffect object references that we need. So to start off, we just check if these assumptions are correct.
event Activated()
{
   if (VariableLinks.length >= 2 && VariableLinks[0].LinkedVariables.length > 0 && VariableLinks[0].LinkedVariables[0] != none && VariableLinks[1].LinkedVariables.length > 0 && VariableLinks[1].LinkedVariables[0] != none)
   {
   }
}
In this if statement, we first check if the VariableLinks array is greater or equal to two. Since we need two objects (UTEffectsGenerator and UTEffect), there should be two VariableLinks present. In each of these VariableLinks the LinkedVariables array should be greater than zero. Lastly, in the first index within LinkedVariables there should be an object reference there.
3. Because LinkedVariables are stored as SequenceVariables, but are actually SeqVar_Objects we first need to type cast the LinkedVariables we've found into SeqVar_Objects. Hopefully then, SeqVar_Objects will contain references to UTEffectGenerators and UTEffect.
event Activated()
{
   local SeqVar_Object sv_obj;

   if (VariableLinks.length >= 2 && VariableLinks[0].LinkedVariables.length > 0 && VariableLinks[0].LinkedVariables[0] != none && VariableLinks[1].LinkedVariables.length > 0 && VariableLinks[1].LinkedVariables[0] != none)
   {
      sv_obj = SeqVar_Object(VariableLinks[0].LinkedVariables[0]);

      if (sv_obj != none)
      {
      }

      sv_obj = SeqVar_Object(VariableLinks[1].LinkedVariables[0]);

      if (sv_obj != none)
      {
      }
   }
}
As seen here, we've added a local variable to temporarily store the results of the type cast. This is done so we can actually check if the type cast was valid or not, and it would save a lot of headaches in future (if a level designer was to put something into the link that wasn't what we expected for example).
4. Now that we have type casted to SeqVar_Object's, we can then try to retrieve the level instances of UTEffectsGenerator and UTEffect that have been linked to this Kismet node. We create two local variables that will hold references to UTEffectsGenerator and UTEffect, and we attempt to retrieve them from sv_obj via the GetObjectValue() function. GetObjectValue() returns an object reference, so we will need to type cast these to the appropriate types.
event Activated()
{
   local SeqVar_Object sv_obj;
   local UTEffectsGenerator ut_effects_generator;
   local UTEffect ut_effects;

   if (VariableLinks.length >= 2 && VariableLinks[0].LinkedVariables[0] != none && VariableLinks[1].LinkedVariables[0] != none)
   {
      sv_obj = SeqVar_Object(VariableLinks[0].LinkedVariables[0]);

      if (sv_obj != none)
         ut_effects_generator = UTEffectsGenerator(sv_obj.GetObjectValue());

      sv_obj = SeqVar_Object(VariableLinks[1].LinkedVariables[0]);

      if (sv_obj != none)
         ut_effects = UTEffect(sv_obj.GetObjectValue());
   }
}
5. Finally, we have the level instances of UTEffectsGenerator and UTEffect. However, before we use them it is good practice to still check that these references are actually valid. Thus we do a check for none and if they aren't none, we tell the reference to UTEffect to set its effect onto the reference of UTEffectsGenerator. We do this by calling our SetEffect() function within UTEffect, which in turn will call the SetEffect() function within UTEffectsGenerator.
event Activated()
{
   local SeqVar_Object sv_obj;
   local UTEffectsGenerator ut_effects_generator;
   local UTEffect ut_effects;

   if (VariableLinks.length >= 2 && VariableLinks[0].LinkedVariables[0] != none && VariableLinks[1].LinkedVariables[0] != none)
   {
      sv_obj = SeqVar_Object(VariableLinks[0].LinkedVariables[0]);

      if (sv_obj != none)
         ut_effects_generator = UTEffectsGenerator(sv_obj.GetObjectValue());

      sv_obj = SeqVar_Object(VariableLinks[1].LinkedVariables[0]);

      if (sv_obj != none)
         ut_effects = UTEffect(sv_obj.GetObjectValue());

      if (ut_effects_generator != none && ut_effects != none)
         ut_effects.SetEffect(ut_effects_generator);
   }
}
And then, we're done with this Kismet node.
TUTORIAL 12.20 - DELEGATES & KISMET, PART V: SEQACT_USE
1. Much like in SeqAct_SetEffect, we once again override the Activated() event.
event Activated()
{
}
2. Much like in SeqAct_SetEffect, we traverse our VariableLinks and their LinkedVariables to find the Actor instance that is connected to this Kismet node.
event Activated()
{
   local SeqVar_Object sv_obj;
   local Actor a;

   if (VariableLinks.length >= 1 && VariableLinks[0].LinkedVariables.length > 0 && VariableLinks[0].LinkedVariables[0] != none)
   {
      sv_obj = SeqVar_Object(VariableLinks[0].LinkedVariables[0]);

      if (sv_obj != none)
      {
         a = Actor(sv_obj.GetObjectValue());
      }
   }
}
3. Now that we have the actor reference, we check for none and call the UsedBy() function. This is a utility Kismet node and can be used for any Actor that implements that function.
event Activated()
{
   local SeqVar_Object sv_obj;
   local Actor a;

   if (VariableLinks.length >= 1 && VariableLinks[0].LinkedVariables.length > 0 && VariableLinks[0].LinkedVariables[0] != none)
   {
      sv_obj = SeqVar_Object(VariableLinks[0].LinkedVariables[0]);

      if (sv_obj != none)
      {
         a = Actor(sv_obj.GetObjectValue());

         if (a != none)
            a.UsedBy(none);
      }
   }
}
4. Now that we've finished our base classes and the Kismet nodes we require, we now move onto the fun parts … creating the effects!
TUTORIAL 12.21 - DELEGATES & KISMET, PART VI: UTEFFECT_EXPLOSION
1. To start, we override the Effect function that is present in the parent class (UTEffect).
function Effect(UTEffectsGenerator InGenerator)
{
}
2. For this effect, all we want to do is to spawn an explosion particle effect similar to the rocket explosion and play an explosion sound as well. This effect would work well for doing timed explosions for certain things such as collapsing buildings for example. So, we create a local variable to hold a reference to the emitter which handles our particle spawning.
function Effect(UTEffectsGenerator InGenerator)
{
   local EmitterSpawnable es;
}
3. From here, lets spawn our emitter and set the particle system template. Since we want to spawn the emitter where the UTEffectsGenerator is, we will use UTEffectsGenerator's location and rotation. Again, before using it, we check to see if it is none.
function Effect(UTEffectsGenerator InGenerator)
{
   local EmitterSpawnable es;

   if (InGenerator != none)
   {
      es = Spawn(class'EmitterSpawnable',,, InGenerator.Location, InGenerator.Rotation);

      if (es != none)
         es.SetTemplate(ParticleSystem'WP_RocketLauncher.Effects.P_WP_RocketLauncher_RocketExplosion');
   }
}
4. And to complete the effect all we need to do now is to add the explosion sound effect.
function Effect(UTEffectsGenerator InGenerator)
{
   local EmitterSpawnable es;

   if (InGenerator != none)
   {
      InGenerator.PlaySound(SoundCue'A_Weapon_RocketLauncher.Cue.A_Weapon_RL_Impact_Cue');
      es = Spawn(class'EmitterSpawnable',,, InGenerator.Location, InGenerator.Rotation);

      if (es != none)
         es.SetTemplate(ParticleSystem'WP_RocketLauncher.Effects.P_WP_RocketLauncher_RocketExplosion');
   }
}
5. First effect is all done. As an extra exercise, you could perhaps try to make both the sound cue and the particle system configurable for the Editor.
Hint: you would do this by making global variables holding references to the sound cue and the particle system which are editable
TUTORIAL 12.22 - DELEGATES & KISMET, PART VII: UTEFFECT_GRENADERING
In this effect, we will be throwing grenades in a ring pattern from the UTEffectsGenerator. The step angle of each grenade is configurable by the level designer. 1. So to start, we will declare an Editor global variable.var(GrenadeRing) int Angle;This will put Angle inside the GrenadeRing category when the level designer opens the properties window. 2. As before, we again override the Effect function from the parent class.
function Effect(UTEffectsGenerator InGenerator)
{
}
3. Since we wish to center the spawning ring within the UTEffectsGenerator, we will check for none and also check our Angle value as the level designer may have put in a value we can't use.
function Effect(UTEffectsGenerator InGenerator)
{
   if (InGenerator != none && Angle > 0 && Angle < 65535)
   {
   }
}
4. Let's sort out the sound effect first.
function Effect(UTEffectsGenerator InGenerator)
{
   if (InGenerator != none && Angle > 0 && Angle < 65535)
   {
      InGenerator.PlaySound(SoundCue'A_Weapon_RocketLauncher.Cue.A_Weapon_RL_GrenadeFire_Cue');
   }
}
5. The first thing we need to do is generate the ring based on the angle step that the level designer. Since grenades are going to be thrown, we might as well just spawn them in a single place and just ensure that their velocities make it look like they were spawned in a ring pattern. (You could if you really wanted, spawn the grenades in a ring start position as well). Remembering that the maximum rotation value within Unreal Engine is 65535, we add a for iterator that counts up to 65535. Each iteration will plus the angle step.
function Effect(UTEffectsGenerator InGenerator)
{
   local int i;

   if (InGenerator != none && Angle > 0 && Angle < 65535)
   {
      InGenerator.PlaySound(SoundCue'A_Weapon_RocketLauncher.Cue.A_Weapon_RL_GrenadeFire_Cue');

      for (i = 0; i < 65535; i = i + Angle)
      {
      }
   }
}
6. Perfect, now that we have the iterator setup we can then spawn each grenade and calculate its rotation. We setup a local variable to hold the rotation value at each iteration. On each iteration, we only need to alter the Yaw value of the rotator. We also create a local grenade variable to hold a reference to the grenade we spawn.
function Effect(UTEffectsGenerator InGenerator)
{
   local int i;
   local rotator r;
   local UTProj_Grenade grenade;

   if (InGenerator != none && Angle > 0 && Angle < 65535)
   {
      InGenerator.PlaySound(SoundCue'A_Weapon_RocketLauncher.Cue.A_Weapon_RL_GrenadeFire_Cue');
      r.Pitch = 0;
      r.Roll = 0;

      for (i = 0; i < 65535; i = i + Angle)
      {
         r.Yaw = i;
         grenade = Spawn(class'UTGame.UTProj_Grenade',,, InGenerator.Location, r);
      }
   }
}
7. Finally we set the velocity of each grenade. Using our rotator value, we convert it to a vector and multiply it by a float to obtain a velocity value. Setting the float higher or lower will increase or decrease how far a grenade is launched.
function Effect(UTEffectsGenerator InGenerator)
{
   local int i;
   local rotator r;
   local UTProj_Grenade grenade;

   if (InGenerator != none && Angle > 0 && Angle < 65535)
   {
      InGenerator.PlaySound(SoundCue'A_Weapon_RocketLauncher.Cue.A_Weapon_RL_GrenadeFire_Cue');
      r.Pitch = 0;
      r.Roll = 0;

      for (i = 0; i < 65535; i = i + Angle)
      {
         r.Yaw = i;
         grenade = Spawn(class'UTGame.UTProj_Grenade',,, InGenerator.Location, r);

         if (grenade != none)
            grenade.Velocity = vector(r) * 300.f;
      }
   }
}
And with that, we now have an effect which will throw grenades in a ring pattern.
TUTORIAL 12.23 - DELEGATES & KISMET, PART VIII: UTEFFECT_GIBBAGE
In this effect we will be spawning a number of gibs that will fly off in random directions. We would like to make the amount of gibs controllable by the level designer. 1. So to start, we'll declare an Editor global variable.var(Gibbage) int Amount;This will put the Amount variable within the Gibbage category when the level designer opens the properties window. 2. As before, we override the Effect function from the parent class.
function Effect(UTEffectsGenerator InGenerator)
{
}
3. Since all of the gibs will spawn from the UTEffectsGenerator instance, we need to check for none. We will also need to check Amount to make sure it is above zero.
function Effect(UTEffectsGenerator InGenerator)
{
   if (InGenerator != none && Amount > 0)
   {
   }
}
4. We need to set up an iterator which will iterate from zero until Amount.
function Effect(UTEffectsGenerator InGenerator)
{
   local int i;

   if (InGenerator != none && Amount > 0)
   {
      for (i = 0; i < Amount; ++i)
      {
      }
   }
}
5. Because we have a range of gibs we can spawn, let's make another function which will randomly select a gib class for us to use. Make a new function called GetRandomGibClass() which will return a UTGib_Human class.
function class<UTGib_Human> GetRandomGibClass()
{
}
6. Add a switch statement with a Rand(5) as its parameter. We use five here since there are five types of human gibs available to us.
function class<UTGib_Human> GetRandomGibClass()
{
   switch(Rand(5))
   {
   }
}
7. Since there are five types of human gibs to select from, just return all five classes depending on what the random value was.
function class<UTGib_Human> GetRandomGibClass()
{
   switch(Rand(5))
   {
      case 0:
         return class'UTGib_HumanArm';

      case 1:
         return class'UTGib_HumanBone';

      case 2:
         return class'UTGib_HumanChunk';

      case 3:
         return class'UTGib_HumanHead';

      case 4:
      default:
         return class'UTGib_HumanTorso';
   }
}
8. Now, let's spawn some gibs!We made a local variable called gib so that we can hold a temporary reference to the gib we just created.
function Effect(UTEffectsGenerator InGenerator)
{
   local int i;
   local UTGib_Human gib;

   if (InGenerator != none && Amount > 0)
   {
      for (i = 0; i < Amount; ++i)
      {
         gib = Spawn(GetRandomGibClass(),,, InGenerator.Location, InGenerator.Rotation);
      }
   }
}
9. In Unreal Tournament 3, gibs are actually simulated physically using the physics engine PhysX. This means they bounce around and collide with the world using some what realistic physics. This means that we'll have to set the gib's velocities and initialize them so PhysX will simulate them.
function Effect(UTEffectsGenerator InGenerator)
{
   local int i;
   local UTGib_Human gib;

   if (InGenerator != none && Amount > 0)
   {
      for (i = 0; i < Amount; ++i)
      {
         gib = Spawn(GetRandomGibClass(),,, InGenerator.Location, InGenerator.Rotation);

         if (gib != none)
         {
            gib.Velocity = Vector(RotRand()) * RandRange(200.f, 400.f);

            if (gib.GibMeshComp != none)
            {
               gib.GibMeshComp.WakeRigidBody();
               gib.GibMeshComp.SetRBLinearVelocity(gib.Velocity, false);
               gib.GibMeshComp.SetRBAngularVelocity(VRand() * 50.f, false);
            }
         }
      }
   }
}
We first set a random velocity for the gib, by getting a random rotation multiplied by a random value that will be between two hundred and four hundred. We then check if the gib has a mesh component which PhysX requires. If the gib has one, we then wake it up so that PhysX will take over and set random velocities. SetRBLinearVelocity() sets the linear traveling velocity of the object. SetRBAngularVelocity() sets the spinning velocity of the object. With that we have a rather neat gibbing effect.
TUTORIAL 12.24 - DELEGATES & KISMET, PART IX: SETTING UP THE TEST BED
1. Compile the code, and start up Unreal Editor. 2. When Unreal Editor has loaded, open up DM-Chapter12-Kismet. As you can see it is just a small bare bones level with some decorative static meshes, some lights and a player start.
Figure 12.9 – The DM-CH_12_Kismet map. 3. When the map has loaded up, we then need to the classes within our code package so that we can add the new classes (UTEffectsGenerator, UTEffect_Explosion, UTEffect_Gibbage, UTEffect_GrenadeRing) into the map. These should be available in the Actor Browser automatically. If not, we will need to load the script package. To do this, open up the Generic Browser, if it is not open, switch to the Actor Classes tab, click on File and then Open. This will bring up a file dialog from which you can select the package you wish to open.
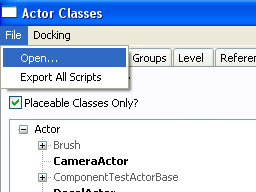
Figure 12.10 – The File->Open command enables you to load script packages. When the package has loaded, you should see the new classes within the Actor Browser.

Figure 12.11 – The classes are available within the Actor Browser class tree. 4. From here we can now select and place our UTEffectGenerator some where within the map. We have this neat mesh sitting in the middle of the floor within the right room. So let's put our UTEffectsGenerator just above that. Select the UTEffectsGenerator within the ActorBrowser, then right click within the level viewport where you would like to place it. In the context menu, you will be able to do this by clicking 'Add UTEffectsGenerator Here'.
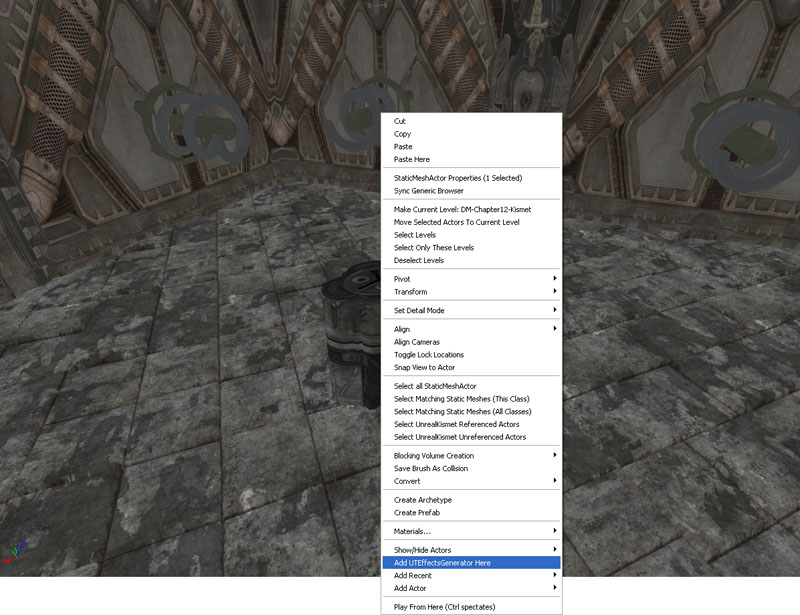
Figure 12.12 – The UTEffectGenerator is added to the map. 5. The newly added UTEffectsGenerator should be sitting on top of the tube like mesh.
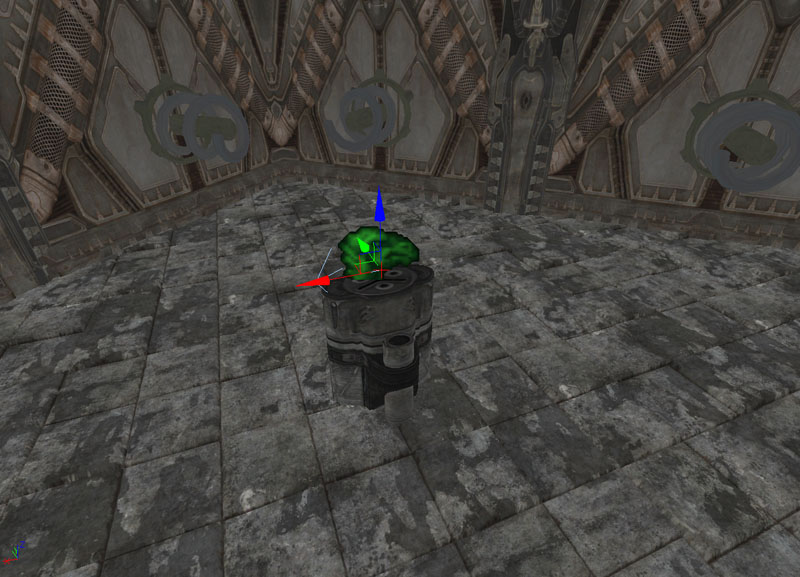
Figure 12.13 – The placement of the UTEffectGenerator actor. 6. We'll need to tweak the rotation properties of the UTEffectsGenerator. Now that it is selected (or select it if it isn't), press F4 to bring up its properties window.
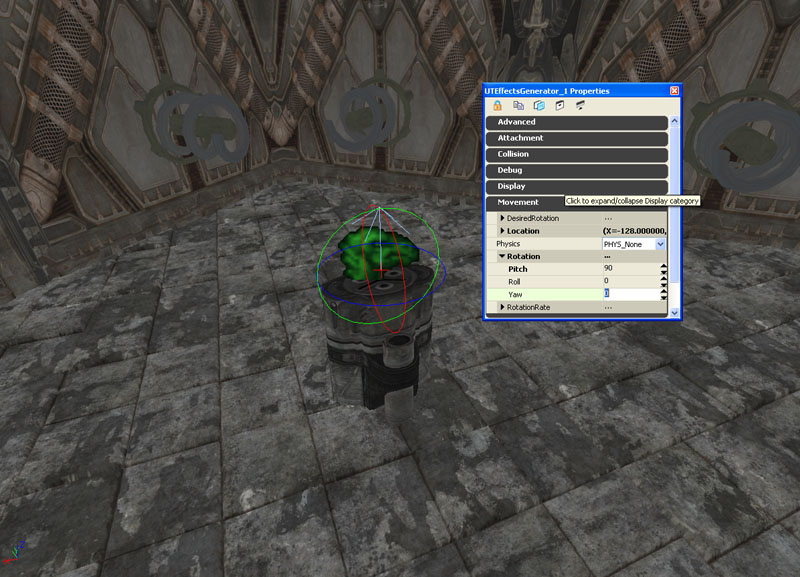
Figure 12.14 – The Rotation property of the UTEffectGenerator is adjusted. 7. Next we need to add our UTEffect instances within the level. Let's place them in the corner of our level so that we can easily find them. Add them in the same way as you did with UTEffectsGenerator by selecting each one from the Actor Browser then right clicking to add them via the context menu.
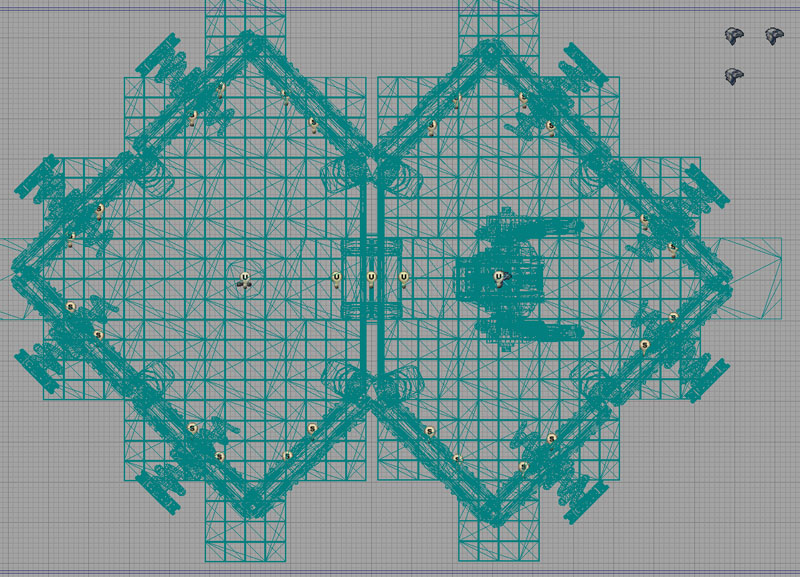
Figure 12.15 – The UTEffect actors are palced outside the level geometry. 8. For this example, we will need a Physics Volume to trigger our UTEffectsGenerator. Start by setting the building brush to cover the same area as the door way. Those settings should cover the door way pretty well.
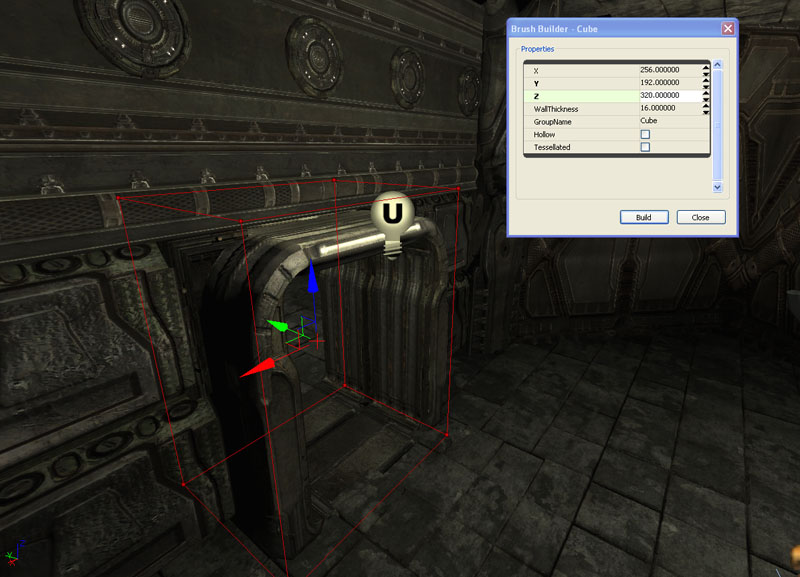
Figure 12.16 – The placement of the red builder brush. 9. Now that we have the building brush where we want it. Right click on the 'Add Volume' button from the left hand menu and select 'PhysicsVolume' to add it within the map.
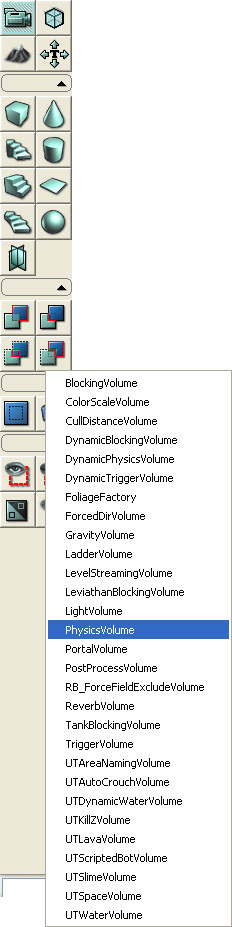
Figure 12.17 – PhysicsVolume is selected from the Add Volume menu. 10. We now have a Physics Volume within our map. Select it by clicking on it. If you have difficulty selecting it within the 3D viewport, switch to a 2D viewport and select it from there.
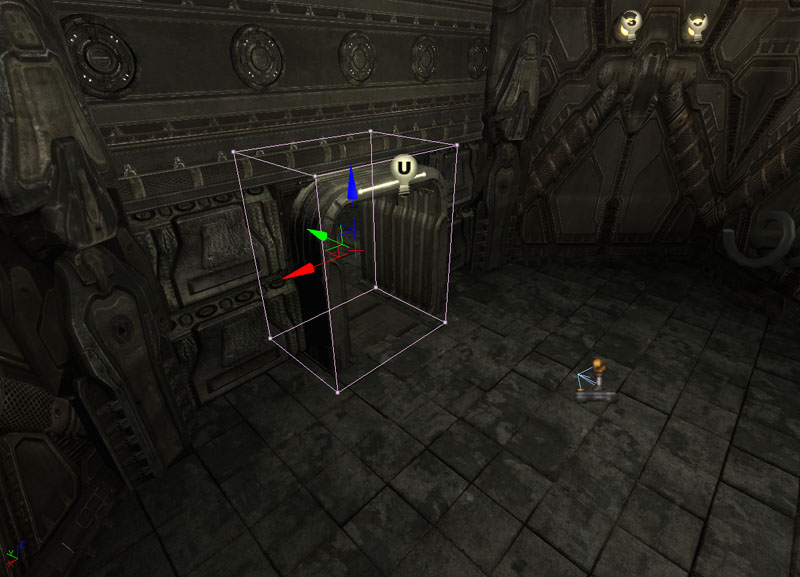
Figure 12.18 – The PhysicsVolume is selected. 11. Open up Kismet by clicking on the Kismet button in the main toolbar of Unreal Editor. You should now see the Kismet editor.
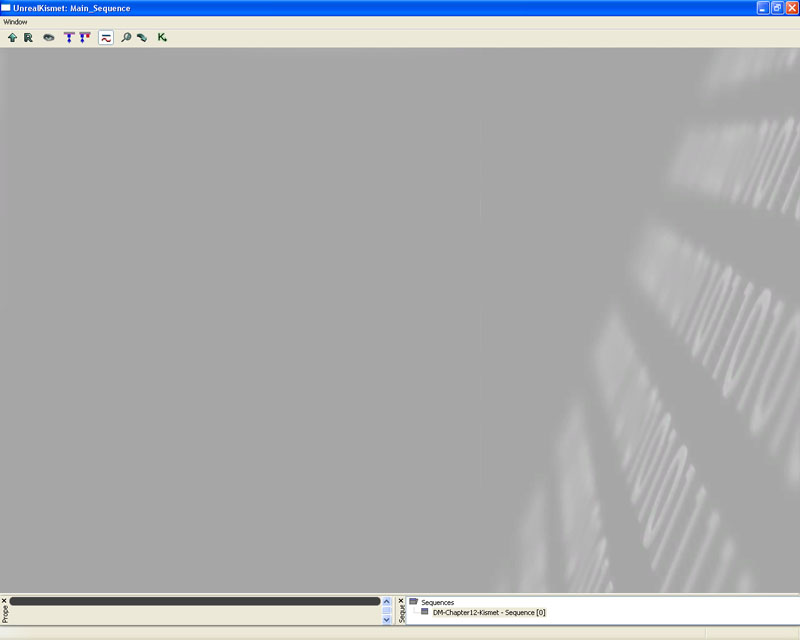
Figure 12.19 – The Kismet Editor. 12. Right click to bring up a context menu. Let's create a Touch event using the Physics Volume (remember to select the Physics Volume before you do this). This will create an event Kismet node which will trigger when the Physics Volume is touched. It responds to two specific engine events, being touched and untouched. Touched is triggered when an actor's collision touches within the owner's collision. Untouched is the reverse. Touched and Untouched are called once, meaning actors will not continually touch another actor.
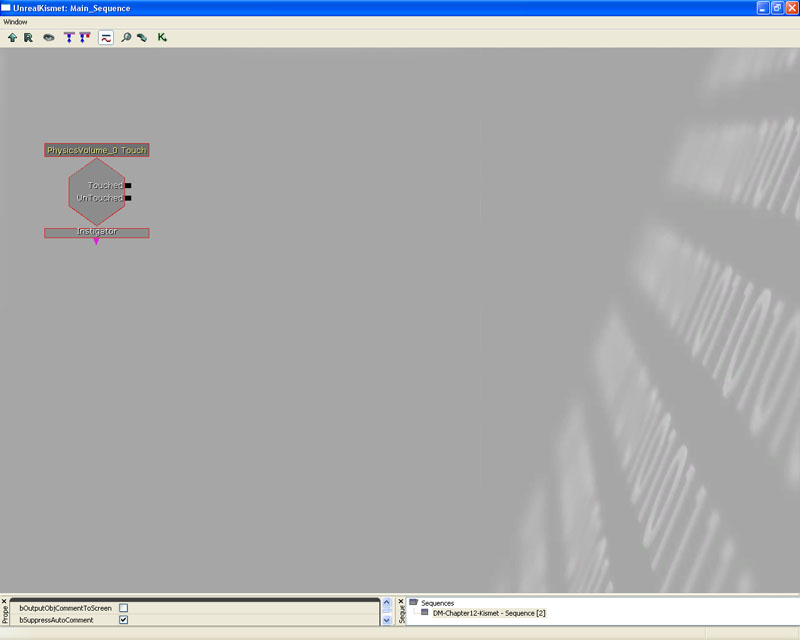
Figure 12.20 – The Touch event has been created. 13. We need to make an adjustment to the Touched event node. By default, it sets the MaxTriggerCount to 1, meaning that it will only ever trigger once and then disable itself. In this particular case, we'd like to make it triggerable forever. In the bottom left corner, there is a properties section for each node that is selected. If you scroll down, there is a value called MaxTriggerCount. Set this to 0.
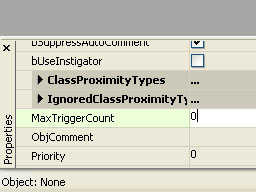
Figure 12.21 – The MaxTriggerCount is set to 0. 14. Now we want to do something when the physics volume has been touched. Let's create an Action node which uses something. This is actually the SeqAct_Use node that we created earlier. Once again, traversing through the context menu, add the Use action node from the Effect Generator category.
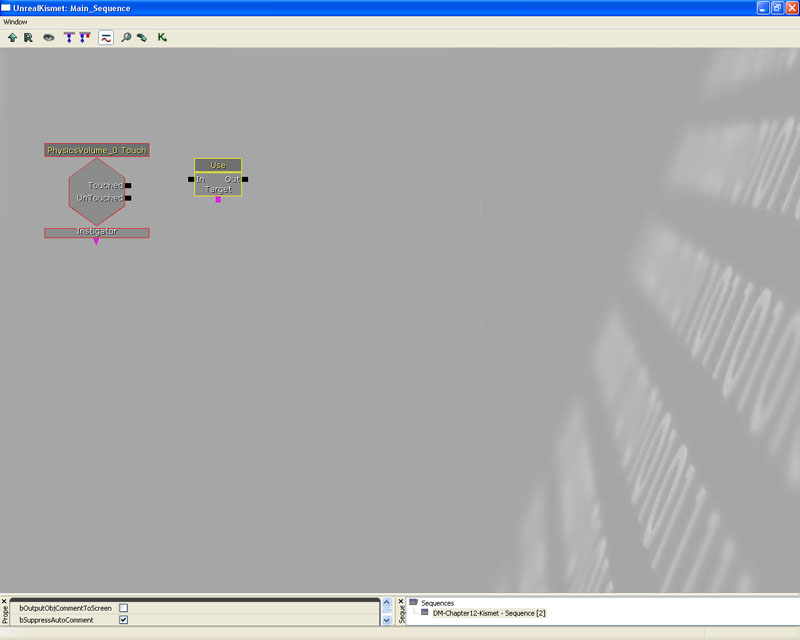
Figure 12.22 – The Use action is added. 15. Now we selected our UTEffectsGenerator from one of the level viewports.
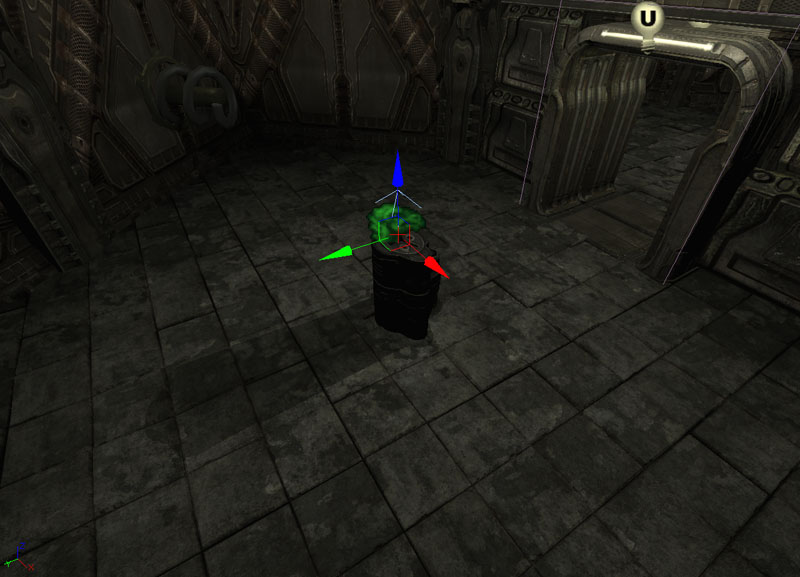
Figure 12.23 – The UTEffectGenerator is selected. 16. Going back to the Kismet Editor window, we can now add a reference to the selected UTEffectsGenerator within Kismet by right-clicking in the workspace and choosing New Object Var Using UTEffectGenerator_0. Note: The name of the actual actor may vary in your map.
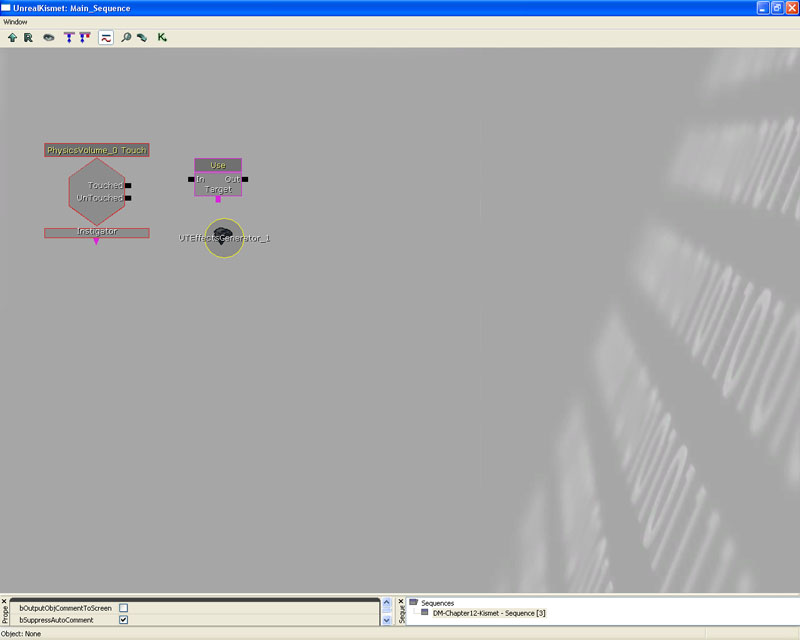
Figure 12.24 – The UTEffectGenerator object variable has been created. 17. Now lets link everything up. Click and drag on the black square box on the right hand size of Touched within the PhysicsVolume_0 Touch node and connect it to the black box on the left hand side of In within the Use node. Then click drag on the purple square box underneath Target within the Use node and connect this to UTEffectsGenerator_1. This tells Kismet to trigger the Use node when the Physics Volume is touched, and the Use node will then use UTEffectsGenerator_1.
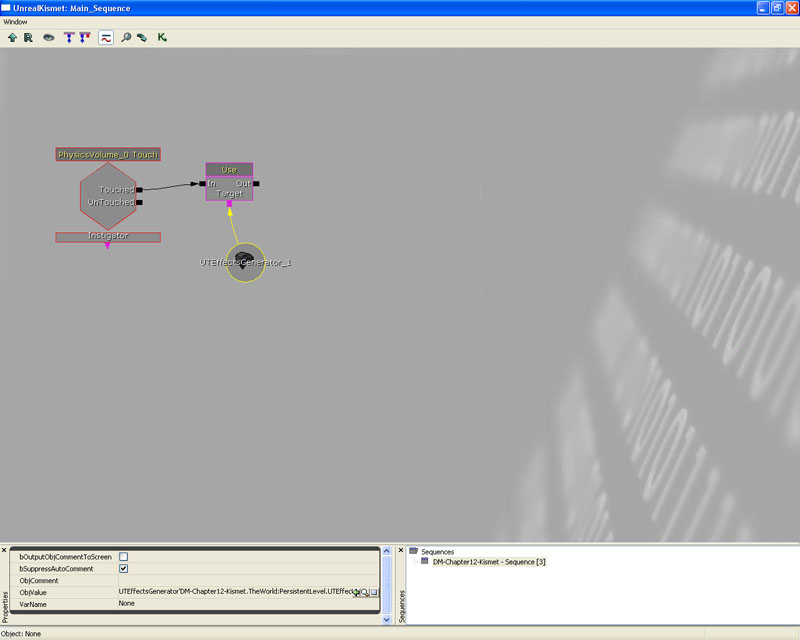
Figure 12.25 – The proper connections have been made. 18. Great, this will handle the basic action that we want. But we still need to handle the process of attaching an effect to UTEffectsGenerator. Since we have three effects, let's attach them randomly to the UTEffectsGenerator. We'll do this by using a random switch to select which one to attach. Right click to open up the context menu, and add a Random switch node by selecting Add Action->Switch->Random.
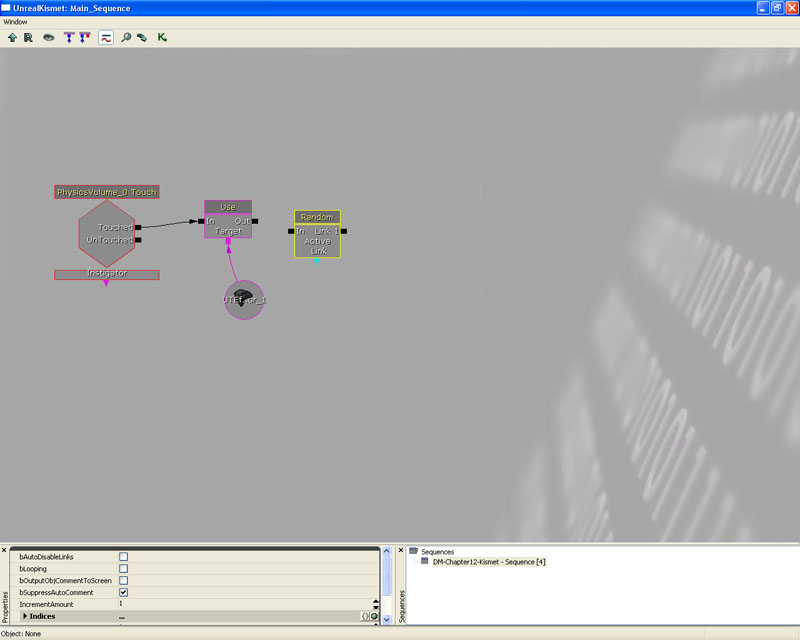
Figure 12.26 – The Random Swicth has been added. 19. We'll need to alter the random switch node properties. Looking in the bottom left hand corner, scroll down and change the LinkCount value from 1 to 3.
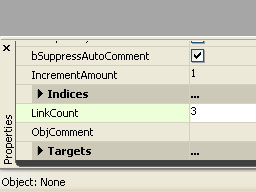
Figure 12.27 – The LinkCount is set to 3. 20. Right click to open the context menu, and add three Set Effect Kismet nodes from the Effect Generator category under Add Action. This is actually SeqAct_SetEffect that we made earlier. After adding three Set Effect Kismet nodes, link them up to the Random switch Kismet node, in the same way as before.
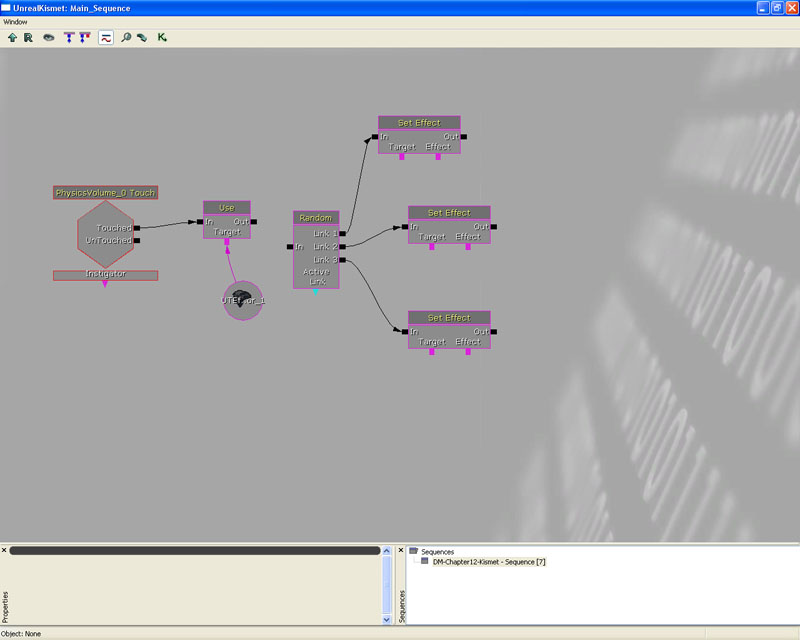
Figure 12.28 – The Set Effect actions are connected to the Random Switch. 21. Let's link everything else up as well. All the of the Set Effect Kismet nodes need to be connected to the UTEffectsGenerator, so they know which UTEffectsGenerator to set the effect to. Also, we link Out within the Use Kismet node to In within the Random Kismet node. Thus, when the Use Kismet node is triggered, it will then trigger the Random Kismet node, which will then trigger one of the three Set Effect Kismet nodes.
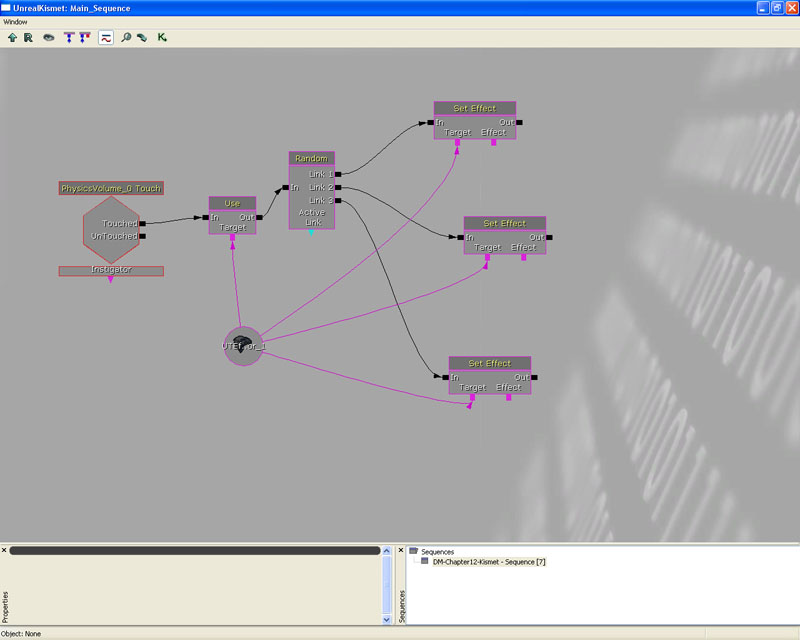
Figure 12.29 – The remaining connections are made. 22. Go back to the level viewport, and select one of the UTEffects that we placed within the level. When one is selected, add it as an object into Kismet in the same process as you did earlier with UTEffectsGenerator. Right click to open the context menu, and which ever UTEffect you selected should appear within the context menu.
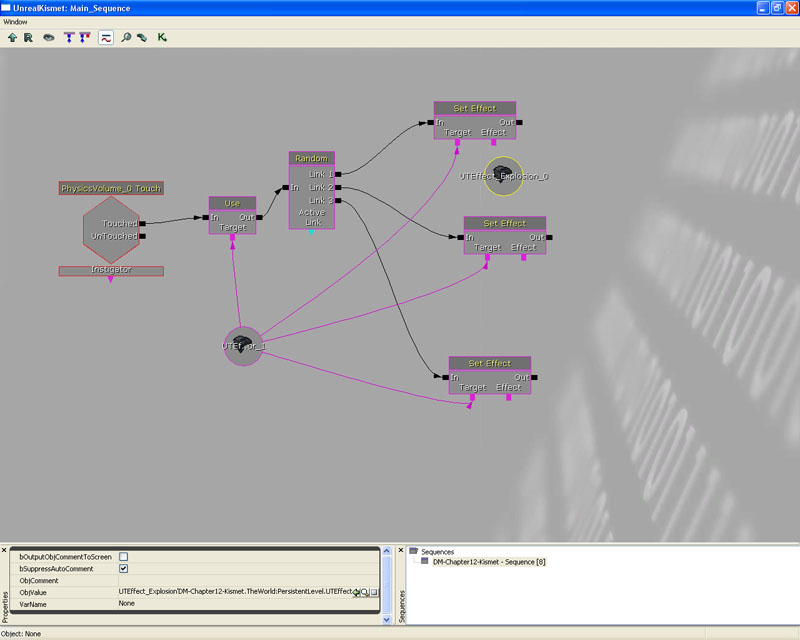
Figure 12.30 – The UTEffect object variable is created. 23. Repeat this with the other two UTEffects. Once all three have been placed within the Kismet Editor window, link each one up to a Set Effect Kismet node.
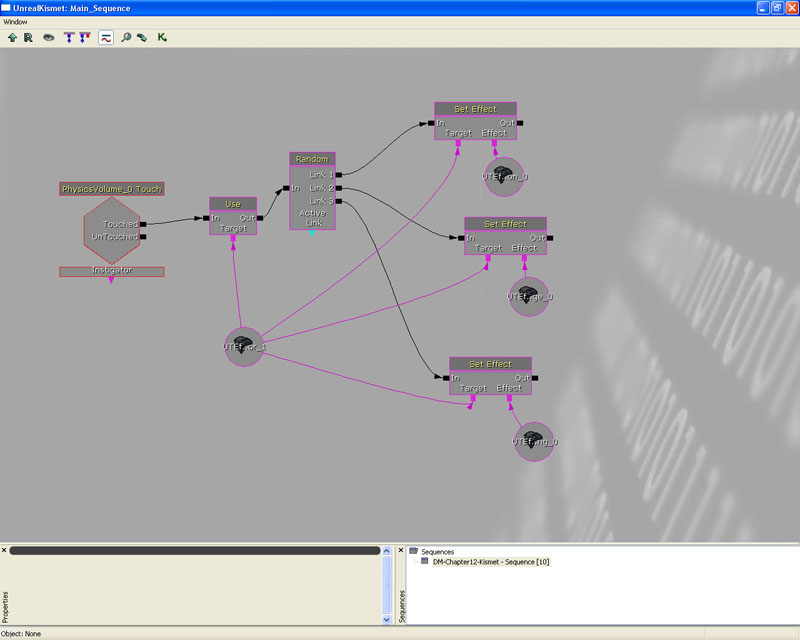
Figure 12.31 – All three UTEffect variables are linked to the Set Effect actions. 24. Great, now we have the majority of the logic in place. However, when the level first loads, the UTEffectsGenerator doesn't yet have a UTEffect assigned to it. So, let's fix that. Right click to open the context menu, and create a new event Kismet node which triggers when the level is loaded and visible.

Figure 12.32 – The Level Loaded and Visble event has been added. 25. All we need to do now is to link up the Level Loaded And Visible Kistmet node to the Random Kismet node. We do this because we only need to set an effect to the UTEffectsGenerator and nothing else when the level is loaded.
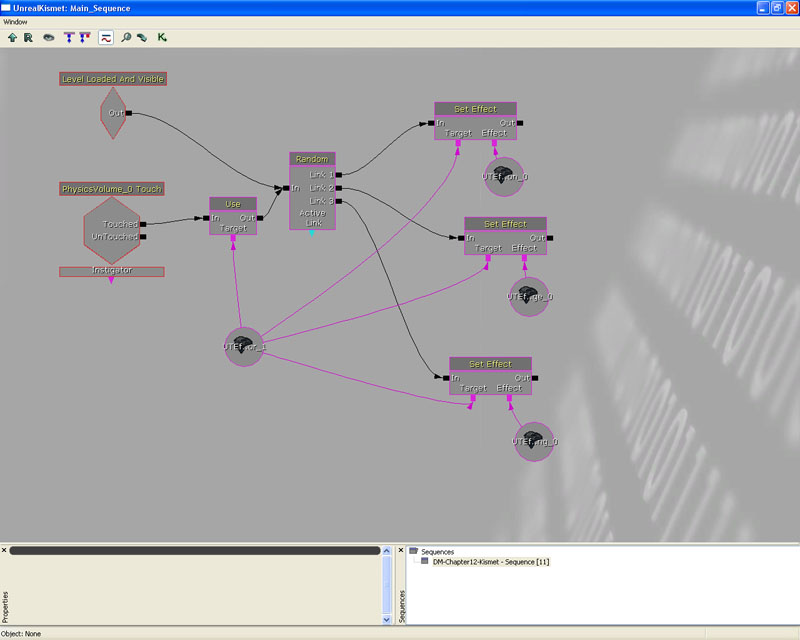
Figure 12.33 – The new event is linked to the Random Switch. 26. And that's all we will need to do with Kismet. Now we need to test everything. Press the Build All button in the main toolbar to build the entire level. 27. Once the level has been built, click on the PIE button to launch a small window from which you can test this level out. 28. Run through the volume placed in the level. You should see one of the effects. It works!
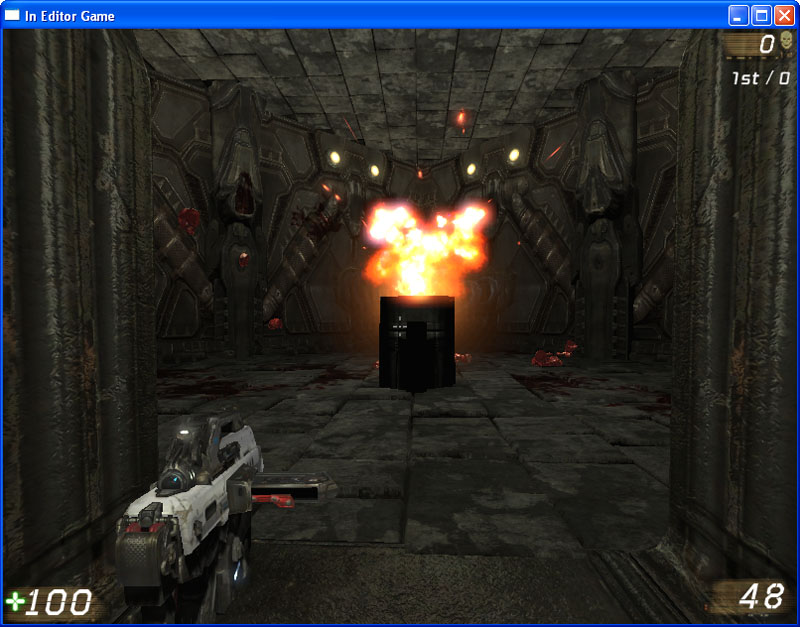
Figure 12.34 – One of the effects is activated. 29. Because we created editable variables within UTEffect_Gibbage and UTEffect_GrenadeRing, they both show up in Unreal Editor. Using this, the level designer is able to modify the way the effect works. By exposing more variables like this, your effects could wind up being very flexible for the programmer. Feel free to go back and adjust these variables to create different effects.
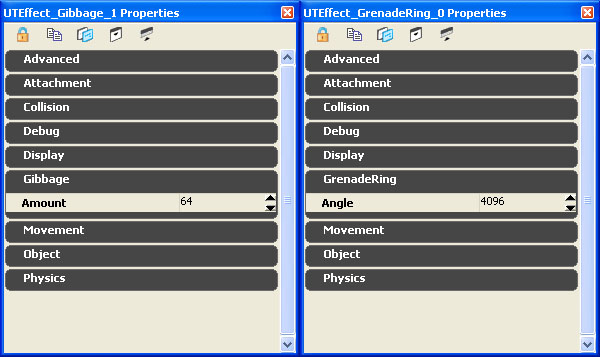
Figure 12.35 – The editable properties of the Gibbage and Grenade effects. In this tutorial we looked at how we could use delegates together with Kismet. Because Kismet is more object orientated with its approach, the fact that delegates bind to a function within an instance allows this example to work the way it does. This is important because we also wanted to allow level designers not only to be able to alter what effect was generated by the effects generator, but also to tweak each effect in a way that was easy to use. While there are methods to do this, delegates not only made this task a lot easier to do, it was also done in a rather flexible way.
12.10 - SUMMARY
Over this chapter we have looked into delegates in depth, and I hope that you have been able to take away something from this chapter. Typically delegates are used when the execution of code changes a lot, or if you just need to write some particularly flexible code. Delegates are useful tools within Unrealscript and definitely should always be considered a viable method of doing certain types of tasks. In Unreal Tournament 3 they were mostly used within the GUI, simply to allow third parties to modify and change the behavior of specific events. As shown by the tutorials in this chapter, delegates are useful almost anywhere really. Unfortunately, when to use a delegate is largely decided upon experience. Since Unreal Engine has to determine which function the delegate maps to, this can be a relatively slow way of handling somethings, although it is a much cleaner method than a few other methods.SUPPLEMENTAL FILES
- DM-Chapter12-Kismet.rar: DM-Chapter12-Kismet.ut3 map
- Chapter12_CompleteSource.rar: Complete Source Files
