UDN
Search public documentation:

PostProcessEditorUserGuide
日本語訳
中国翻译
한국어

Interested in the Unreal Engine?
Visit the Unreal Technology site.

Looking for jobs and company info?
Check out the Epic games site.

Questions about support via UDN?
Contact the UDN Staff

UE3 Home > Unreal Editor and Tools > Post Process Editor User Guide
UE3 Home > Post Process Effects > Post Process Editor User Guide
UE3 Home > Cinematic Artist > Post Process Editor User Guide

Post Process Editor User Guide


Overview


The post process framework allows for artist-configurable post process effects, through groupings of post process elements forming an overall effect. Examples of elements and effects include bloom (HDR blooming effect on bright objects), depth of field, motion blur, and material effects, which are custom materials run on the final scene image.

For explanations of the various effects provided with Unreal Engine 3, see the Post Process Effect Reference.

Opening the Post Process Editor


The Post Process Editor can be opened by double-clicking any post process effect asset or through the right-click context menu of a post process effect asset in the Content Browser. Either of these will open up that particular post process effect asset in the Post Process Editor for editing. It's possible to assign each level its own post processing chain. The property to define the chain is named "World Post Process Chain".

Post Process Editor Interface


The Post Process Editor is divided into the following regions:

postprocesseditor.jpg

  1. Menu Bar
  2. Graph Pane
  3. Properties Pane

Menu Bar

Window

  • Properties - Toggles display of the Properties Pane.
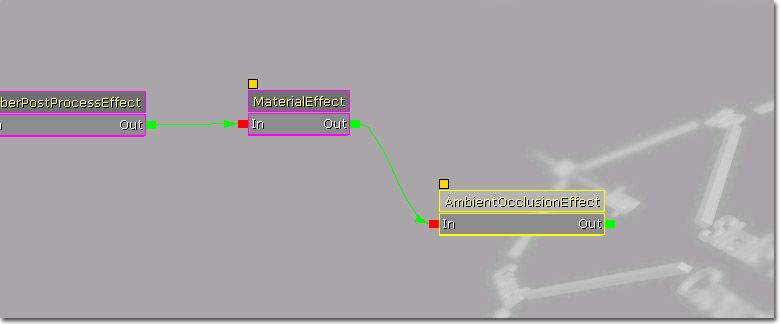
Graph Pane

This is the guts of the Post Process Editor. It displays the post processing chain from right to left and uses the same interface as many other UnrealEd node-based editors. By default it has one node, the SceneRenderTarget, which is the current rendered scene, with no effects applied. You connect new effects to this node to alter what's displayed on-screen.

Context Menu

Right-clicking in the editor opens up a context menu that displays a list of nodes which can be added to the graph:

Effect Description
MaterialEffect User created material.
MotionBlurEffect Blurs the scene based on object velocities.
UberPostProcessEffect Optimized combination of DOF, Bloom, Motion Blur, Color Grading and Tone Mapping.

Each effect has customizable properties, shown in the Properties Pane. Once the effects are dropped in they can be linked together by dragging from the outputs to the inputs to form new connections:

ppnodes.jpg

Properties Pane

The Properties Pane shows the properties for the currently selected node in the Graph Pane. These properties can be edited to modify the effect of the node, and ultimately the overall post process effect.

Creating an Effect


A new effect grouping can be added in the generic browser, by creating a Post Process Effect object. Double clicking this object will open the Post Process Editor.

Defaults


Default post process effects are set through the *Engine.ini configuration file option:

[Engine.Engine]
DefaultPostProcess=SomePackage.SomeEffect

PostProcessVolumes


To create a PostProcessVolume, move the brush where you want the volume to be and right click on the 'Add Volume' button, then select PostProcessVolume. Now move the brush away and you will see the volume's outline. Bring up the properties. Most of the properties have already been covered, but there are a few unique ones: Note that your post process effect must have the bUseWorldSettings flag set to True in order to be affected by a post process volume. You will only see the effects of each of the post process volumes' settings when your pawn is inside one of the volumes. The deepest volume within a hierarchy of intersecting post process volumes will be the one that is used.

Interpolation Duration


Bloom_InterpolationDuration, DOF_InterpolationDuration, MotionBlur_InterpolationDuration and Scene_InterpolationDuration all control the amount of time that will be used to interpolate between the current settings and the volume's settings when a volume is entered.

Controlling Effects through Matinee


To get control over the postprocess settings in matinee, you need to first create a group with the camera you want to control. Now you can add a new float or vector Param Track and get control of post process settings in Matinee. See the Matinee User Guide page for more details.

Controlling through Gameplay Script


Often it is necessary to change certain post process effects while the game is running based on some gameplay criteria. For example, in Gears of War the post process settings were changed whenver the in-game pause menu came up so that the screen could be blurred and to give the scene a more menacing red tone. By using the ULocalPlayer.bOverridePostProcessSettings property you can override what post process values are currently being used for the player. Then, the player's FCurrentPostProcessVolumeInfo CurrentPPInfo struct gets filled in with the new desired values and the interpolation times to transition to these values.